So this week’s blog post is going to be a bit longer than the others because I’ll be talking a lot about the various hardware upgrades that Jim and I have gotten for the project, and our thought process behind them.
The first and probably most exciting upgrade for us was going from a Raspberry Pi 3 to a Raspbery Pi Zero. We’ve been using a Raspberry Pi 3 for the past couple of weeks in order to test things like the IR sensor, the RFID reader, and even the camera to read QR codes (even though we’ve since abandoned it). However, Jim and I knew that we wouldn’t be using the RPi 3 in the final version of the project for two reasons. Firstly, the model 3 is fairly large. We have to fit all of the electronics inside of the modified vacuum bin of the Roomba, and it was a very tight fit putting the RPi 3, the serial-USB connection, and the IR sensor alone. Secondly, we were worried about the battery consumption of the model 3. At nearly a third of the size and one sixth of the power consumption, the RPi Zero easily solves both of these problems.
However, even though using the RPi Zero was the best solution to our problems with the RPi 3, it didn’t come without it’s problems. The biggest being the lack of USB ports. With our current setup, we need to have two open USB ports. One will be used for a WiFi dongle so we can collect sensor information in real-time, and the second to use to talk to the Roomba. Simple solution to this was to get a USB hub. The one we found is actually really neat, it fits nicely on the underside of the RPi and just screws into the mounting holes. No soldering needed at all! Now that we had figured out the issues with the RPi, we could move on to some of the problems with our ‘track’ that the Roomba would follow.
A few blog posts ago, we discussed the use of an RFID reader instead of a QR code scanner. The RFID reader that we had tested operated on the 125 kHz range, and its tags were roughly the size of a credit card. Eric and David expressed their concerns with having a dozen or so credit card sized tags lining the floor of the server room, so I looked into the possibility of using smaller tags. A week later, a package arrived containing what I believe to be the smallest 13.65 MHz RFID tags that we could buy. Measuring at 3 mm square, you can clearly see the size difference between the two cards.
Again, this upgrade didn’t come without its own problems. Because we’re using a different frequency tags, we needed a new reader to be able to scan them. Our old reader was very plug-and-play friendly, only needed a few lines of Python to get it up and running, but our new reader is a bit of a mystery. The only code we can find to get it running is for Arduino, and even then we’re having trouble scanning the tags. Next week we plan to look into reading and writing to the tags.
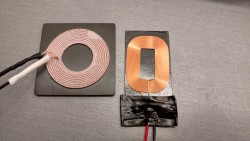
The last upgrade that Jim and I got this week was for our inductive charger. We noticed that the rate of charge was a bit slower than the rate of consumption on the RPi 3, and we wanted to be sure that the RPi would be able to run 24/7, so in combination with a greatly reduced power consumption (RPi Zero), we beefed up our inductive charger. This should ensure that we’ll be able to keep a constant supply of power to the RPi Zero.
That about wraps it up for this week! Next week, along with getting our new RFID reader up and running, Jim and I will be thoroughly testing the Roomberry on a makeshift track to iron out any issues that could come up regarding line-following and RFID tags.