How do I use WordPress with my Linux Fusion website?

How do I use WordPress with my Linux Fusion website?

Installation guide for WordPress on a Linux Fusion site.

Running WordPress CMS (content management system) on your Fusion website is quite simple. If you’ve ever wanted to use WordPress to manage your web site, but didn’t know how to get started, we’ve put together a quick (~6 minute) video tutorial on how to install WordPress inside your Fusion web site from DataYard.

Please note, this tutorial is specific to Linux Fusion hosting environments.

If you have any questions please feel free to contact support.

What steps should I take if I choose to switch from POP to IMAP?

What steps should I take if I choose to switch from POP to IMAP?

The steps needed to switch your account from POP3 to IMAP.

When switching your account from POP to IMAP, you want to make sure that you don’t lose any important information during the transition. This blog will show you the easiest way to make the change and give you all the little details you need to watch to make sure nothing is lost in the process.

The first thing you want to do is make sure you have a recent backup of the file your email is stored in just in case something goes wrong. If you’re not sure how to make a backup, start here: How do I backup my Outlook 2010 client?

Once your backup is complete, you are ready to begin making the switch!

Open your Outlook client and choose the File tab from the top left hand side of the screen.

Next, select Options from the bottom of the list.
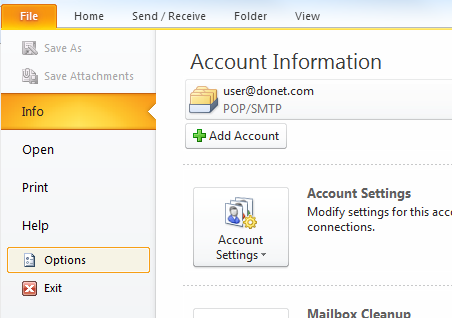
popimap1

From the Options Screen you will choose Advanced from the menu on left hand side of the screen, scroll down a bit and you will click the send/receive button.

popimap2

Select All Accounts and then click Edit.
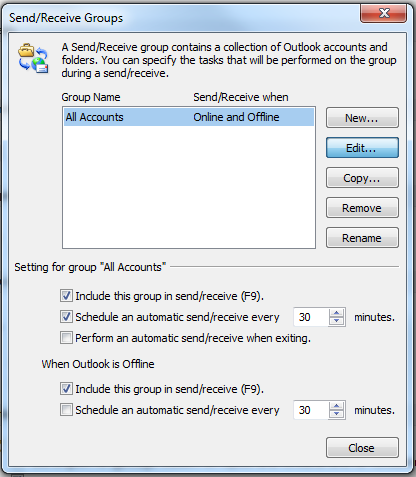
popimap3

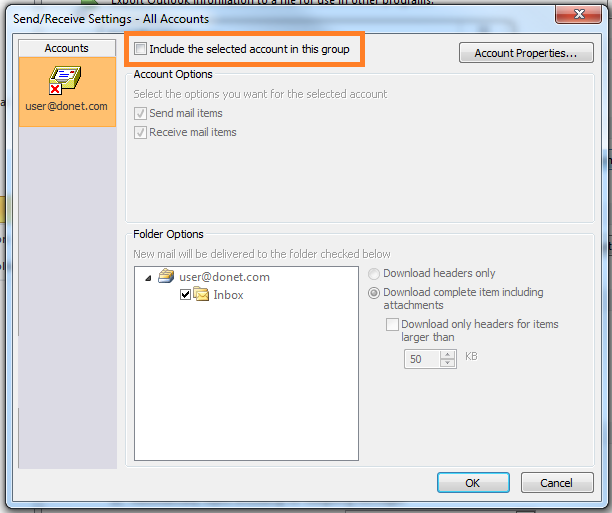
Select your POP account on the left side and uncheck the box next to “Include the selected account in this group.” If you have more than one send/receive group, make sure that your account is disabled under the other groups as well.
popimap4

Now that your POP account is disabled from the send/receive group, you can add in the IMAP account. Select File>Add Account.

popimap5

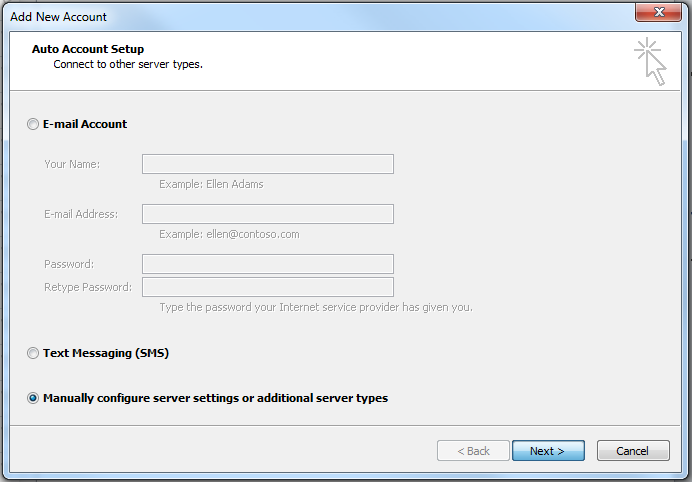
In the new window select Manually Configure Server Settings or additional Server Types.
popimap6

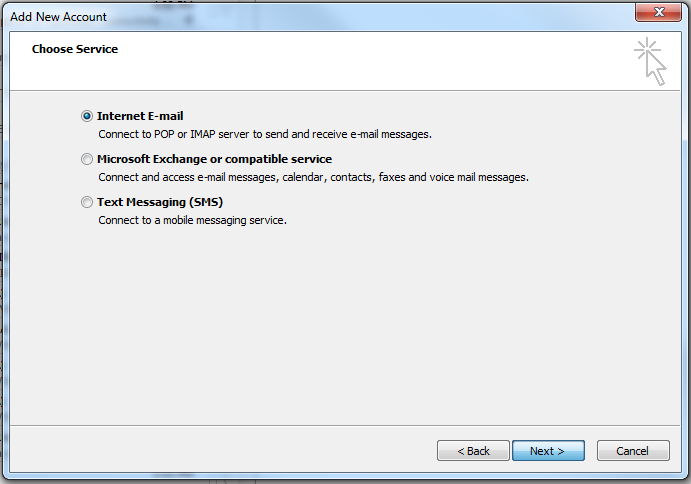
Select Internet Email and hit Next.

popimap7

Complete the following information for the NEW account.

  • Your Name: Name
  • Email Address:  Your full Email address
  • Account Type: IMAP
  • Incoming Mail Server: imap.donet.com
  • Outgoing Mail Server: smtp.donet.com
  • User Name: Your Username
  • Password: Your email password

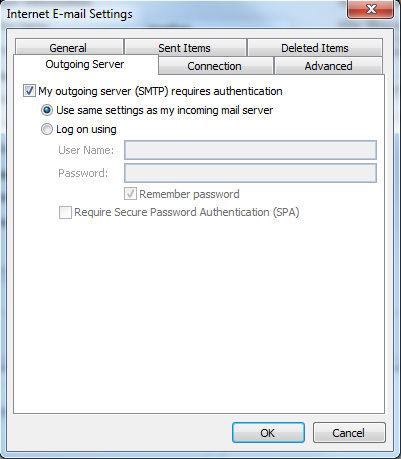
In the new window, select the Outgoing Server tab at the top and check “My outgoing server (SMTP) requires authentication” and use same settings as my incoming mail server.
popimap9

Click on the Advanced tab, and change the outgoing server port number to 587. Then click OK. In the remaining “Add New Account” window, click Next followed by Finish.

Now, on the left Outlook menu (where your accounts and folders are listed), you should see both the POP and IMAP accounts listed. The account with the “(1)” next to it is the new IMAP account.

popimap10

In order to make sure you don’t lose any of your messages and can access them all under the same folder, click on the POP account (the one without the “(1)” next to it) and either select the folders and drag them to the IMAP account or select all of the messages (CTRL + A = select all) and drag them to the IMAP account.

For this example, I selected all of the messages in the inbox of the POP account and dropped them in the inbox of the IMAP account.

Once your mail has all been copied from the POP account to the IMAP account, you can remove the POP account.

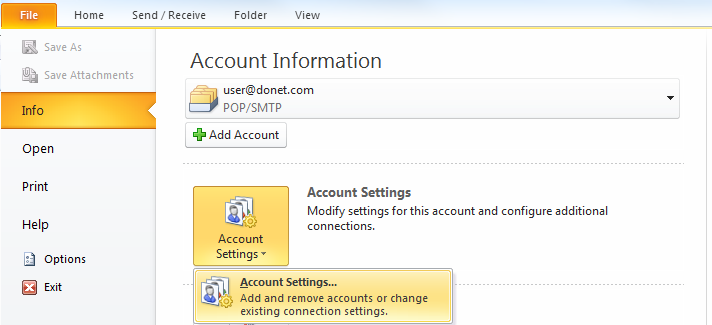
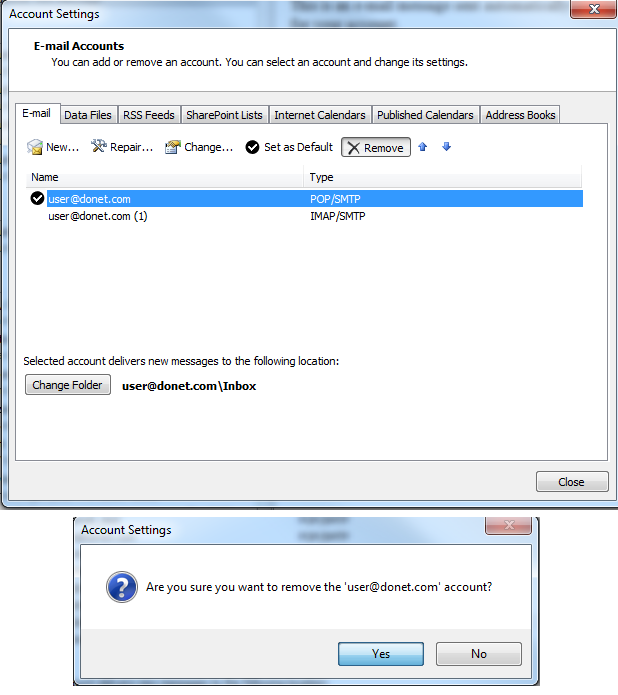
To do this, first click on File followed by Account Settings.
popimap11

Next, select the account under the Email tab that says “POP/SMTP” under “Type,” and click Remove. Click Yes in the pop-up removal confirmation window.

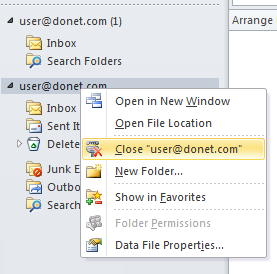
Back at the Home page of Outlook, on the left mail menu, right click on the POP account (the one you removed in the previous step that does not have the (1) next to it) and select Close [email address].
popimap12

popimap13

You have now successfully switched from using POP to IMAP.

How can I reset the password for my E-mail account?

DataYard does not keep passwords stored in plain text for security reasons so we are unable to retrieve current passwords. Passwords can be reset by our support staff as needed.

Please contact technical support contact support.

If you have a password that you would like to use please make sure that you provide it to us and that it abides by the following minimum password requirements:

  • Passwords must be at least 6 characters in length and include a minimum of 1 numeral or special character (examples: %$&^&*)
  • Passwords can NOT contain the username. For example if your username is [email protected] the word ‘test’ cannot be part of your password.

How can I add additional Disk Space to my VDC virtual instance?

How can I add additional Disk Space to my VDC virtual instance?

Assistance with adding additional Disk Space to your VDC.

If you are in need of additional Disk Space in your VDC virtual instance you can contact DataYard Sales at 937-226-6896 or e-mail [email protected] for a price quote.

The initial amount of disk space allotted to a new VDC instance is 25GB. Increases are made in 25GB increments, and there is no maximum allowance.

Please be sure to include how much disk space you would like to increase to and your company information.

What dates are available for Ready Backup restores?

What dates are available for Ready Backup restores?

Find the dates that have available backups from your Ready Backup service.

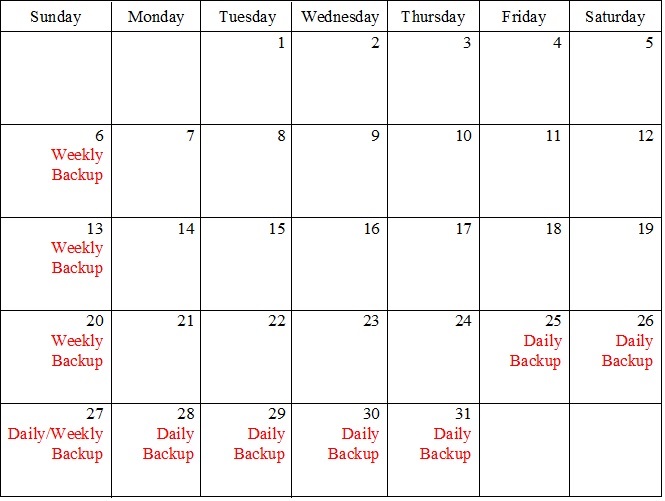
DataYard’s default retention policy for all customer backups includes 7 (seven) daily backups and 4 (four) weekly backups.

This gives you 10 restore points by default, with the oldest being a month.

For example, if you’re calling on the 31st of the month, the following back up dates will be available:

calendar

If you have a customized retention policy contact support for available backups.

How can I direct multiple domain names to my site?

How can I direct multiple domain names to my site?

Who you call to configure multiple domain names to point to one website will vary depending on who your domain is registered through and where it’s hosted. If they are in the same place, it makes this process rather simple.

First, each domain will need to be registered and have DNS hosting setup. Generally, this is done with the same company that provides hosting for your website.

These are the basic steps you will need to take to direct another domain to your website:

  • Register domain name – You can register this domain with any registrar that you choose. However, as I mentioned earlier, it’s easiest to register it with the same company that is doing the hosting for the website. If you wish to register this domain through Tucows, please contact our sales department at 937-226-6896 and they will help you get it registered.
  • Point the new domain name to the proper name servers – Name servers are what connect your domain name to your DNS hosting for that domain. You should have already setup DNS service with your hosting provider and know where to point these.
  • DataYard Name Servers are:
    • dns1.donet.com
    • dns2.donet.com

If you are logged into the Tucows web portal and are managing your name servers, you will go to Name Servers

And then enter the name servers, one per line.

Once complete, hit Save Configuration.

Point the domain name to the same IP as your main website – DNS should already be setup with your hosting provider. They will just need to know the IP address of your main website (the primary Address record also points to this). If they are also providing the hosting for the main website they probably already know this information.

Call the hosting provider to set up the alias on the server-side- The last step is to call the hosting provider (if not the same as above) and have them setup a server alias for the new domain.

How can I get Data Center access for a new employe

How can I get Data Center access for a new employee?

What steps do I take to get a new employee access to the Data Center?

To request an access card for a new employee please, contact support.

Be sure to have the following information available:

  • Full Name of the new employee
  • Company
  • Job Title
  • Email Address
  • Business Phone
  • Mobile Number
  • Fax Number
  • Address
  • City
  • State
  • ZIP Code

Please note that the new employee must also provide picture ID when picking up the access card.

How can I get after hours assistance in the Data Center?

How can I get after hours assistance in the Data Center?

How to contact DataYard support staff for after-hours Data Center support.

Data Center employees are on site to assist you Monday – Friday 8am to 5pm.

If you are in need of assistance outside of our normal business hours, please contact support to schedule a time to have a Data Center administrator available for you.

If this is an emergency, please use the After Hours Support number provided to you.

How can I get a server in the Data Center power cycled?

How can I get a server in the Data Center power cycled?

Assistance with power cycling a server in DataYard’s Data Center.

If you have a server located inside DataYard’s Data Center and need this device power cycled, please contact support. We will work with you to resolve the issue quickly.

Please be sure to provide the following:

  • Cabinet Number
  • Identification of the server that needs power cycled (label ID, Brand/Model)

If you need after hours support please be sure to use the after-hours support number provided to you.

What are DataYard’s Data Center Standards?

What are DataYard’s Data Center Standards?

Standards that are enforced within the Data Center.

All customers’ entering DataYard’s Data Center must be aware of the following standards set and maintained by DataYard:

  1. The client may never modify or tamper with any equipment existing inside the data center(s) which is not listed in the Deployment Specifics table of the Agreement. Cabinet location, power deployment, and networking drops are prominently labeled as such.
  2. Devices must not be permitted to exhaust hot air into the cold aisle. For some devices, this may require mounting the device towards the rear of the cabinet and/or employing blanking panels in occupied units.
  3. Multiple devices may never be installed in a cabinet occupying the same cabinet units.
  4. Blanking panels must be employed to prevent airflow through unoccupied cabinet units.
  5. Physical access to the data center(s) must be limited as much as is possible.
  6. No food or drink is permitted in the data center(s) under any circumstance.
  7. All portable crash carts and tables must be returned to their place of origin when work has been completed.
  8. Server packaging, hardware, trash, etc. must not be left in the data center(s) when work has been completed.
  9. Additional hardware is not permitted to be permanently placed upon rack-mounted hardware.
  10. Cable management systems or other custom accessories are not permitted in shared cabinets.
  11. Network and power cables are permanently labeled on both ends by DataYard personnel, and these labels must not be removed or modified.
  12. Floor tiles may not be moved by the client for any reason.

If you need assistance please contact support.