What attachments are blocked by DataYard’s Email filtering?

What attachments are blocked by DataYard’s Email filtering?

A complete list of attachment types that are not allowed through DataYard’s email services.

You should never accept or download any type of file from an unknown source. To help stop the recent increase in malicious files being received via DataYard email accounts, we have implemented new policies regarding the sending and receiving of certain executable files.

If someone attempts to send an email with one of these attachment types, they will receive a non-deliverable message letting them know that we do not accept these types of attachments for security reasons. The message will not be delivered to you.

The list of files that will NOT be accepted are as follows:

  • .ade – MS Access Compiled Database and Code
  • .adp – MS Access Data
  • .bat – Batch
  • .chm – Microsoft Help Document
  • .cmd – Microsoft Batch
  • .com – MS-DOS Executable
  • .cpl – Windows Control Panel Configuration
  • .exe – Win32 Executable
  • .hta – HTML Executable
  • .ins – Windows Internet Settings
  • .isp – IIS Settings
  • .jse – Javascript Encoded Script
  • .lib – Static Library
  • .mde – MS Access Compiled Database and Code
  • .msc – MMC Console Snap-in Control
  • .msi – Windows Installer Package
  • .msp – Windows Installer Patch
  • .mst – Windows Installer Transform
  • .reg – Windows Registery Key
  • .pif – Program Information
  • .ps1 – Powershell Script
  • .psm1 – Powershell Module
  • .psd1 – Powershell Hash Table
  • .scr – Windows Screensaver
  • .sct – Foxpro Compiled Query
  • .shb – Windows Document Shortcut
  • .sys – Windows System
  • .vb – VBScript
  • .vbe – VBScript Encoded Script
  • .vbs – VBScript Script
  • .vxd – Windows Virtual Device Driver
  • .wsc – Windows Script Component
  • .wsf – Windows Script
  • .wsh – Windows Script Host
  • .ws – Windows Script File
  • .msh – Microsoft Shell
  • .lnk – Windows Shortcut File
  • .inf – Information or Setup File


As always, if you ever have any questions or concerns please contact our support department Monday-Friday 8am-5pm.

What are the Mail Settings for my POP/IMAP Account?

The settings needed for a POP account are as follows:

Email address: this is your full e-mail address

Username:  the username provided to you by DataYard

Password:  your e-mail password

Incoming mail server:  pop3.donet.com

Outgoing mail server:  smtp.donet.com

Outgoing server authentication:  enabled/password or use same settings as incoming mail server

Incoming server port number:  995

Use the following type of encrypted connection: SSL

Outgoing server port number:  587

Use the following type of encrypted connection: TLS


Mail Settings for using IMAP accounts are as follows:

Email address: this is your full e-mail address

Username:  the username provided to you by DataYard

Password:  your e-mail password

Incoming mail server:  IMAP.donet.com (or pop3.donet.com) they both point to the same server.

Outgoing mail server:  smtp.donet.com

Outgoing server authentication:  enabled/password or use same settings as incoming mail server

Incoming server port number:  993

Use the following type of encrypted connection: SSL

Outgoing server port number:  587 (default is 25)

Use the following type of encrypted connection: TLS


How do I save copies of my e-mail on the DataYard server?

How do I save copies of my e-mail on the DataYard server?

If you would like to access your POP3 e-mail account from multiple locations, or you would simply like to have a copy saved on the server for back-up purposes, you can configure your e-mail program to save a copy of your e-mail on the server. Below, you will find the steps necessary to save copies of your e-mail on the mail server in many popular e-mail programs.

Microsoft Outlook 2010, 2013

  1. Click on ‘File’.
  2. Open the ‘Account Settings’.
  3. In the window that opens, double-click your e-mail account.
  4. In the “change account” window, select ‘More Settings’ at the bottom right.
  5. Select the ‘Advanced’ tab at the top right of the “Internet E-mail Settings” window.
  6. Under the “Delivery” section, select “Leave a copy of messages on server.”
  7. Select the “Remove from server after _ days” option and set the number of days. DataYard recommends using 15 days (or less if you receive a lot of e-mail) to prevent your e-mail account from reaching the server storage limit.
  8. Click “OK.”

Microsoft Outlook 2007

  1. Open the “Tools” menu and select “Account Settings.”
  2. Select your e-mail account, and then click “Change.”
  3. In the “Internet Email Settings” window, click on “More Settings.”
  4. Click the “Advanced” tab.
  5. Under the “Delivery” section, select “Leave a copy of messages on the server.”
  6. Select the “Remove from server after _ days” option and set the number of days. DataYard recommends using 15 days (or less if you receive a lot of e-mail) to prevent your e-mail account from reaching the server storage limit.
  7. Click “OK” followed by “Next” and “Finish.”

Microsoft Outlook 2002, 2003

  1. Open the “Tools” menu, and select “Email Accounts” or “Account Settings.”
  2. Select “View or change existing e-mail accounts.” Click “Next.”
  3. Select your e-mail account, and then click “Change.”
  4. In the “Internet Email Settings” window, click on “More Settings.”
  5. Click the “Advanced” tab.
  6. Under the “Delivery” section, select “Leave a copy of messages on the server.”
  7. Select the “Remove from server after _ days” option and set the number of days. DataYard recommends using 15 days (or less if you receive a lot of e-mail) to prevent your e-mail account from reaching the server storage limit.
  8. Click “OK” followed by “Next” and “Finish.”

Microsoft Outlook 1998, 2000

  1. Open the “Tools” menu and select “Accounts.”
  2. Select the “Mail” tab.
  3. Select your e-mail account and then click “Properties.”
  4. In the new window, select the “Advanced” tab.
  5. Under the “Delivery” section, select “Leave a copy of messages on the server.”
  6. Select the “Remove from server after _ days” option, and set the number of days. I’d recommend using 15 days (or less if you receive a lot of e-mail) to prevent your e-mail account from reaching the server storage limit.
  7. Click “OK” and then “Close.”

Mozilla Thunderbird

  1. On the left side, select “Server Settings.”
  2. Enable “Leave a copy of messages on the server.”
  3. Select the “Leave messages on server” option as well as “For at most _ days” option. I’d recommend using 15 days (or less if you receive a lot of e-mail) to prevent your e-mail account from reaching the server storage limit.
  4. Click “OK.”

Mac Mail

  1. Open the “Mail” menu and select “Preferences.”
  2. Select “Accounts” and then select your e-mail account.
  3. Click on the “Advanced” tab.
  4. Enable the “Remove copy from server after retrieving a message” option and set the number of days to keep the messages in the field below. I’d recommend using 15 days (or less if you receive a lot of e-mail) to prevent your e-mail account from reaching the storage limit.
  5. Close the Accounts window.

Windows Live Mail

  1. Open the “Tools” menu and select “Accounts”
    Select your e-mail account and then click “Properties”
  2. In the “Properties” window, click the “Advanced” tab
  3. Under the “Delivery” section, select “Leave a copy of messages on server”
  4. Select the “Remove from server after _ days” option and set the number of days. I’d recommend using 15 days (or less if you receive a lot of e-mail) to prevent your e-mail account from reaching the server storage limit.
  5. Click “OK”

How do I configure my phone to work with Connect Exchange?

Configuring your smartphone to receive your DataYard email uses the same settings as you would use to configure any other mail client. The setup varies slightly by device release date, but will always need the same set of information to work correctly.

iPhone Configuration

From your home screen choose settings

From the settings screen select mail, contacts and calendars

Next, choose the option Add Account

For the account type, you will choose Exchange

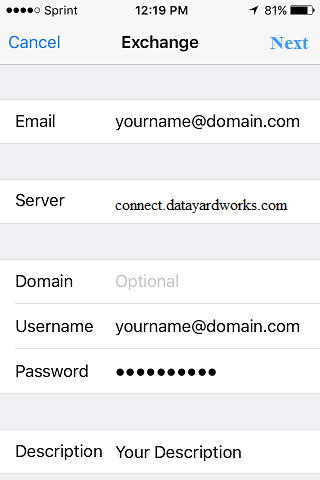
Enter your full e-mail address and your password supplied by DataYard

Enter server connect.datayardworks.com (no domain is needed leave this blank)


iphone

Select  Next

Select Save

Got to your mail app and download your email.


Android Configuration

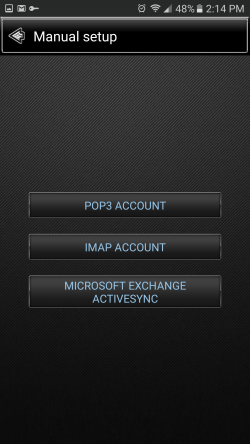
From your mail app choose settings

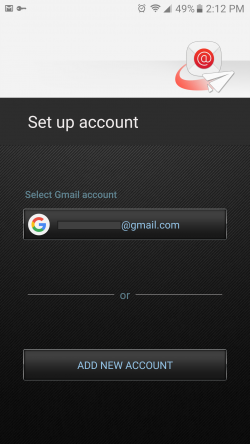
Next, choose the option Add Account


Screenshot_20170203-141228

Screenshot_20170203-141246

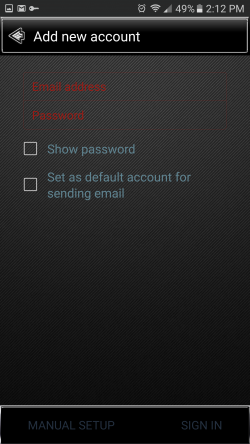
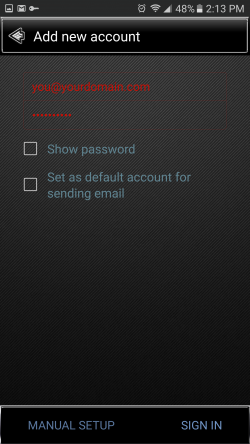
Enter your full e-mail address and your password supplied by DataYard

Screenshot_20170203-141338

For the account type, you will choose Exchange

Screenshot_20170203-141409

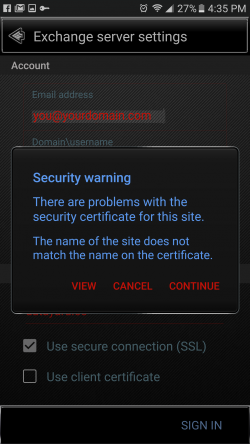
You may get the following certificate error.

Select Cancel

Screenshot_20170203-163549

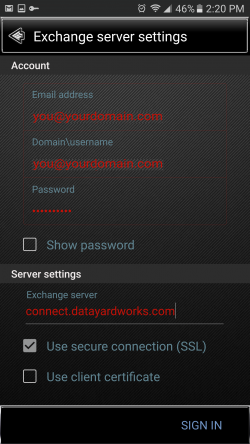
Make sure your Domain\username is the same as your email address (some apps change it)

Enter server connect.datayardworks.com

Select Sign In

Screenshot_20170203-142028

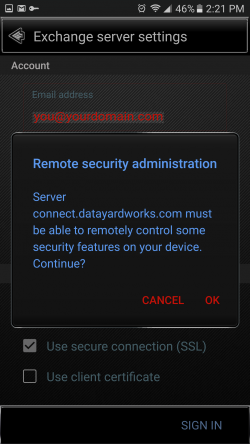
Select OK

Screenshot_20170203-142142

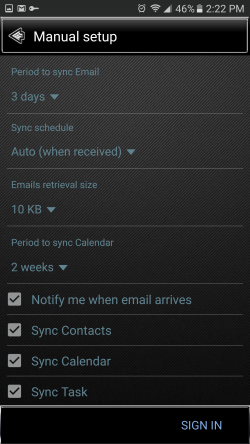
Review these setting and make adjustments based upon your personal preference.

Select Sign In

Screenshot_20170203-142201

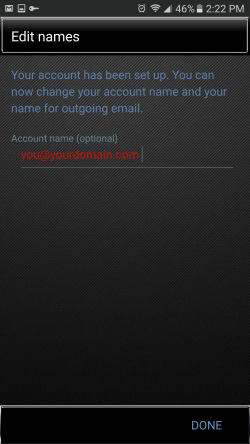
Feel free to update this to whatever you would like that helps you identify this account.  Again this is a personal preference.

Select Done

Screenshot_20170203-142251

If you have any questions please contact DataYard Support.


What are the Mail Settings for my DataYard Account?

What are the Mail Settings for my DataYard Account?

How to configure any mail client with your DataYard e-mail.

If you are setting up Outlook: Outlook 2013/2016Outlook 2010 or Outlook 2007
If you are setting up Mozilla Thunderbird: Mozilla Thunderbird
If you are setting up Mac Mail: Mac Mail 10.8
If you are setting up an iPhone: iPhone 4, 4S, 5, 5C, 5S, or 6 (any)
If you are setting up an Android phone:  Android

If you are setting up any device that is not listed above the following settings should be all you need to get your e-mail working. Please note that actual setup will vary by device and version.

The settings needed for a POP account are as follows:

Email address: this is your full e-mail address
Username:  the username provided to you by DataYard
Password:  your e-mail password
Incoming mail server:  pop3.donet.com
Outgoing mail server:  smtp.donet.com
Outgoing server authentication:  enabled/password or use same settings as incoming mail server
Incoming server port number:  995
Use the following type of encrypted connection: SSL
Outgoing server port number:  587
Use the following type of encrypted connection: TLS


Mail Settings for using IMAP accounts are as follows:

Email address: this is your full e-mail address
Username:  the username provided to you by DataYard
Password:  your e-mail password
Incoming mail server:  imap.donet.com (or pop3.donet.com) they both point to the same server.
Outgoing mail server:  smtp.donet.com
Outgoing server authentication:  enabled/password or use same settings as incoming mail server
Incoming server port number:  993
Use the following type of encrypted connection: SSL
Outgoing server port number:  587
Use the following type of encrypted connection: TLS


How can I configure Mozilla Thunderbird to work with Connect Mail?

How can I configure Mozilla Thunderbird to work with Connect Mail?

How to configure Mozilla Thunderbird to download your DataYard email.

First, you will need to decide if you wish to set this account up as a POP account or an IMAP account, if you are unsure you can see the differences here and use the settings for your chosen account type.

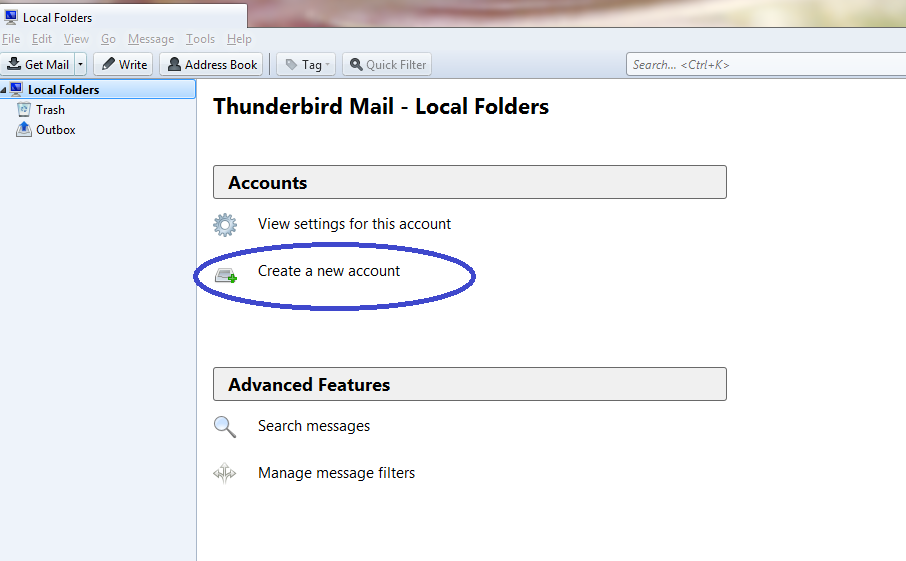
From the main screen after download, choose the option Create a New Account.

tbSetup1

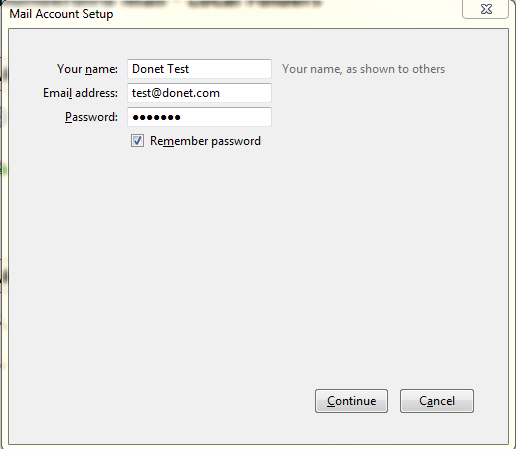
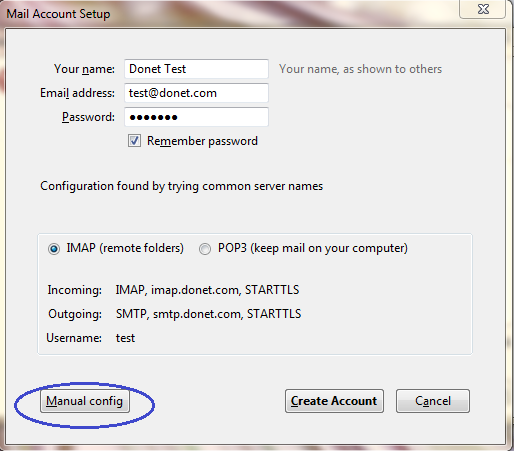
A new screen will pop up, you will enter:

Your Name: As you wish people to see it
Your E-mail Address: Your Full e-mail address
Password: The password provided to you

tbsetup2

Once your information is entered, hit continue. This will start an automatic process that attempts to configure your mail client for you. Once it has completed, you will want to choose the option Manual Config.

tbsetup3

You will need to make sure on this screen that your settings match your chosen account type

POP3:

  • Incoming Server Information
  • Server Type: POP
  • Server Address: donet.com
  • Port: 995
  • SSL: Auto-detect
  • Authenticate: Auto-detect
  • Logon User Name: Your username
  • Outgoing Server Information
  • Server Address: smtp.donet.com
  • Port: 587
  • SSL: Auto-detect
  • Requires Authentication: Checked

OR

IMAP

  • Incoming Server Information
  • Server Type: IMAP
  • Server Address: imap.donet.com
  • Port: 993
  • Authenticate: Auto-detect
  • Logon User Name: Your username
  • Outgoing Server Information
  • Server Address: smtp.donet.com
  • Port: 587
  • SSL: Auto-detect

You will then want to select the button for test or re-test

Then hit Create Account. This will take you directly back to the main screen with no successful completion notification.

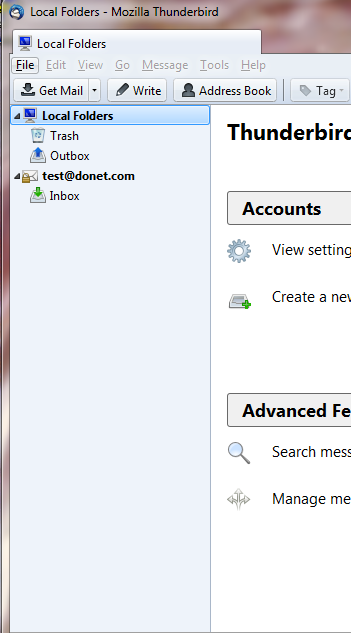
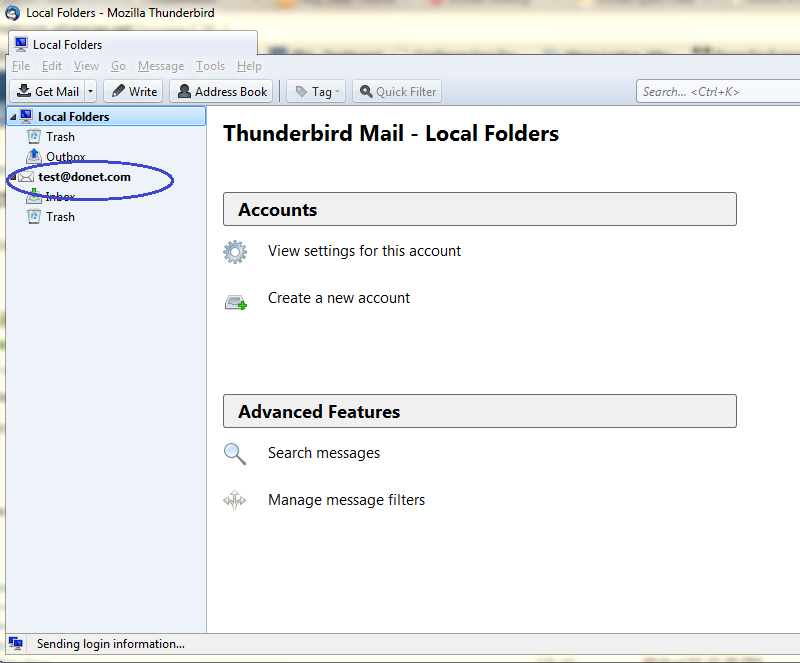
You can verify that the account is created by looking at the menu on the left hand side of the screen, you will see your email address listed

tbSetup6

tbSetup7


How can I check my E-mail without a Mail Client?

How can I check my E-mail without a Mail Client?

DataYard offers webmail, which can be used by any DataYard customers to check your DataYard e-mail from the internet.

To check your mail anywhere an internet connection is available:

  • Open your web browser
  • Type in the address bar ‘webmail.donet.com’

webmail1

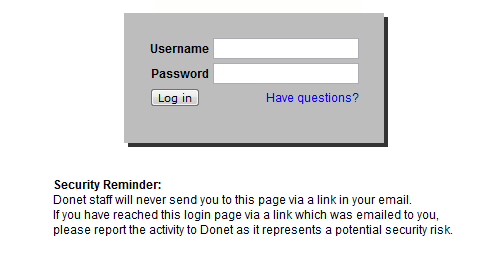
  • Then you will enter your DataYard Username:

If you have your own domain this may not be the same as your e-mail address, if you are unable to log in, please contact DataYard support to verify your username

  • Enter your Password: Your DataYard provided password

webmail2

How can I configure Outlook 2010 to work with Connect Mail?

How can I configure Outlook 2010 to work with Connect Mail?

First, you will need to decide if you wish to set this account up as a POP account or an IMAP account, if you are unsure you can see the differences here and use the settings for your chosen account type.

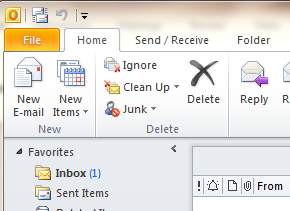
Select the File tab

outlook10Setup1

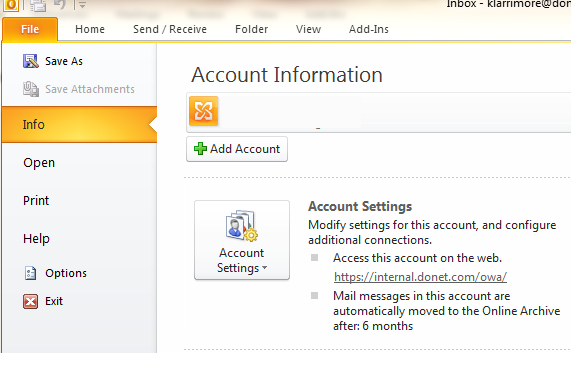
Then choose Info

Select Account Settings

outlook10Setup2

And then select New

outlook10Setup3

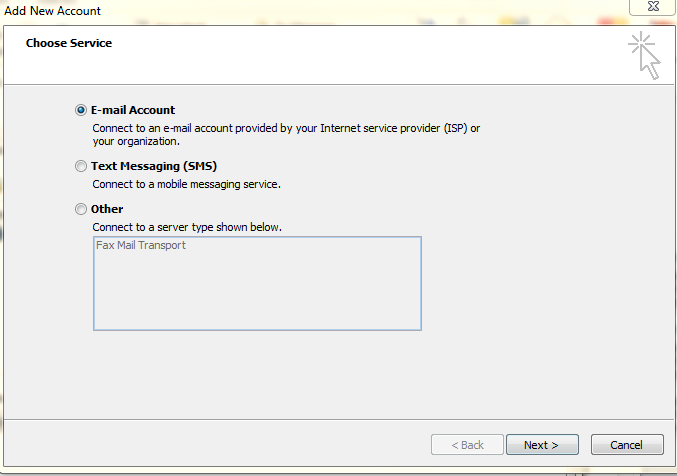
Choose E-mail account and then Next.

outlook10Setup4

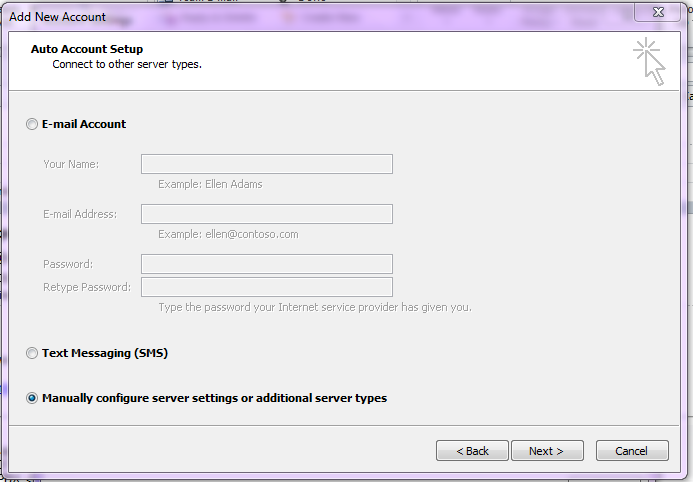
This will bring you to the Auto Account Setup page where you will choose the option to Manually Configure Server Settings or Additional Server Types.

outlook10Setup5

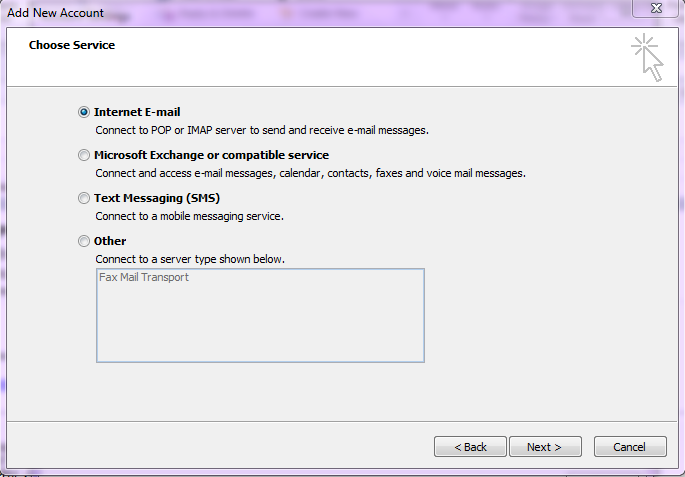
Select Next and choose the option for Internet E-mail.

outlook10Setup6

Then select Next again.

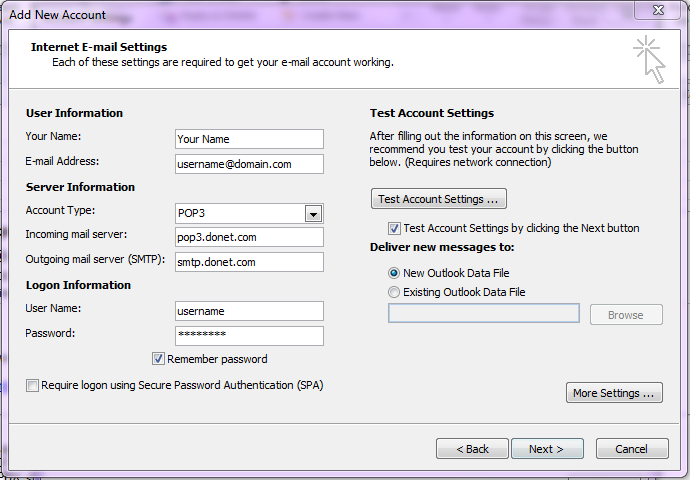
You will then need to enter the following information:

  • Your Name: Your name as you wish it to appear
  • E-mail Address: This is your full email address
  • Account Type: POP3 or IMAP depending on your preference
  • Incoming mail server: pop3.donet.com for POP accounts or imap.donet.com for IMAP accounts
  • Outgoing mail server: smtp.donet.com
  • User Name: the username provided to you with your account information
  • Password: the password provided to you
  • Require logon using Secure Password Authentication (SPA): Should be unchecked

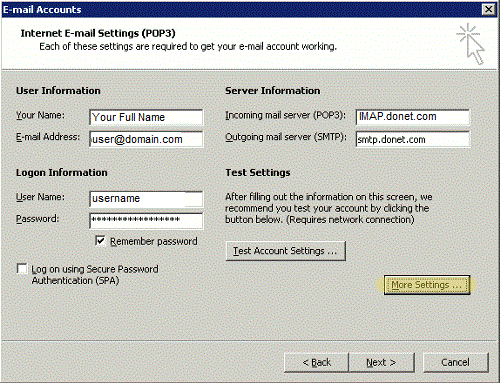
outlook10Setup7

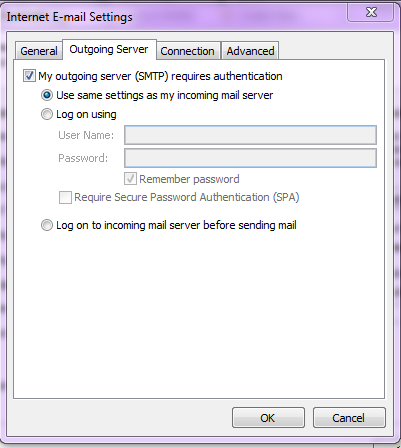
You will then need to select the More Settings button in the lower right hand corner of the screen

Outgoing Server tab: My Outgoing Server Requires Authentication must be checked, using the option Use same settings as my incoming mail server

outlook10Setup8

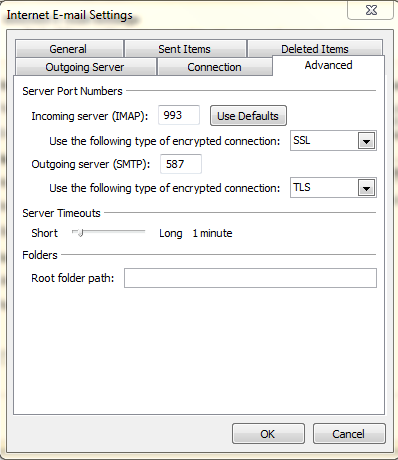
You will then go to the Advanced tab and enter your server port information


POP3:

  • Server Type: POP
  • Server Address: donet.com
  • Port: 995
  • Use the following type of encrypted connection: SSL
  • Authenticate using: Clear Text
  • Logon User Name: Your username
  • Outgoing Server Information
  • Server Address: smtp.donet.com
  • Port: 587
  • Use the following type of encrypted connection: TLS

OR

IMAP:

  • Server Type: IMAP
  • Server Address: donet.com
  • Port: 993
  • Use the following type of encrypted connection: SSL
  • Authenticate using: Clear Text
  • Logon User Name: Your username
  • Outgoing Server Information
  • Server Address: smtp.donet.com
  • Port: 587
  • Use the following type of encrypted connection: TLS

outlook10Setup9

Once this is complete you can hit OK, which will return you to the main screen. Hit Next to test the account settings. If the test completes successfully, you can hit next to exit the setup wizard.

If you have any questions please contact DataYard Support.

How do I backup my Outlook 2010 client?

How do I backup my Outlook 2010 client?

Keeping backups is one of the most important things you can do to ensure you don’t lose emails that are saved in your mail program and important contact information.

Outlook stores all of your emails in a file called a PST File; making regular backups of this file is highly recommended.

From the main screen choose File and then Account Settings

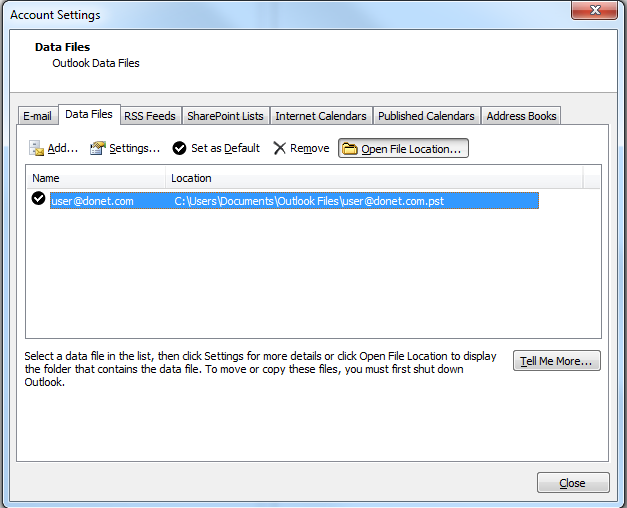
In the Account Settings screen, select the Data Files tab at the top of your screen. Then choose the account you are backing up (if there is more than one).

outlookBackup1

This will open up the directory that contains your data file. You should see something that looks like this:

outlookBackup2

Now, WITHOUT closing this window you want to switch back to your open outlook program and close it by going to File>Exit.

Once Outlook is closed, right-click on the data file and hit copy.

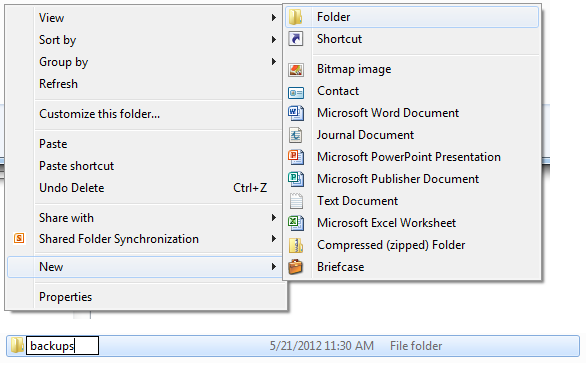
In this same window, you will right-click and choose new>folder. You can name this folder anything you wish, backups is easily identifiable.

outlookbackup3

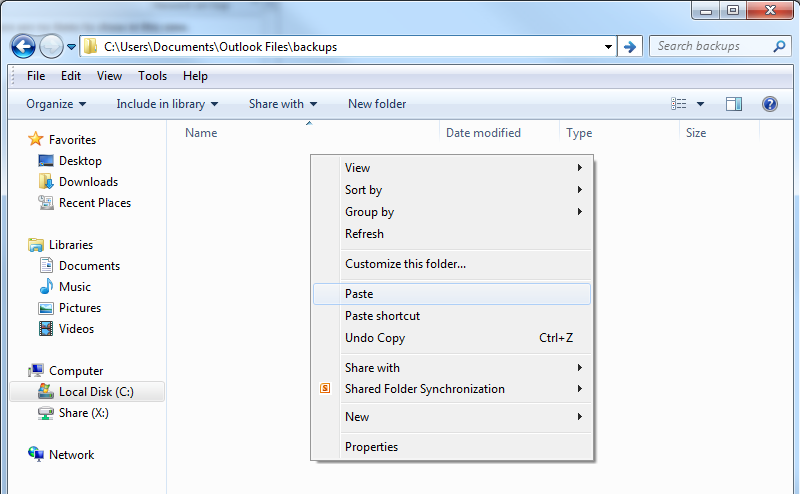
Once you have created this folder you will double click the folder icon to enter the folder and paste your file by right-clicking and then choosing paste.

outlookBackup4

Once you have pasted the file, it will show in the folder, like this:

outlookBackup5

You now have successfully made a copy of your email data! If for some reason you were to lose your email, you will be able to restore from this data file.

If you have any questions please contact DataYard support.

Common Errors: Outlook 2007 asks for your Network Password

Common Errors: Outlook 2007 asks for your Network Password

How to resolve the pop up in Outlook 2007 ‘Enter Network Password’

This prompt appears anytime the password you have stored in your mail client does not match the password that we have in our system. This can happen if you’ve recently updated your password, changed your username, or if Outlook has lost the saved information. This password is the same password that you use to check your email account.

Associated error message:

“Enter Network Password”

To resolve this issue, follow these steps for Outlook 2007:

  • From the main screen select Tools.
  • Select Account Settings.
  • From the Email tab, select your DataYard account and then Change.

netPassOutlook072

  • You will want to remove the password that’s listed (it will be in asterisks) and try re-typing your password to ensure there are no mistakes.

netPassOutlook073

If you are unable to resolve this issue or are unsure of your password you can call DataYard support staff to verify or reset your password.