A Commitment to Radical Privacy

On April 3rd, President Trump signed legislation repealing the FCC’s privacy regulations. As a result, Internet Service Providers (like DataYard, AT&T, Spectrum, etc.) can now quietly gather, store, and sell the Internet histories, communications, and usage patterns of everyone they provide Internet access to. The legislation goes further, by placing restrictions on the types of privacy guidelines the FCC can attempt to institute in the future. If you’re reading this on a screen, this action covers you at this very moment.

I’ve worked at DataYard (and previously DONet) for 11 years, four of those as a Systems Administrator and Data Center Engineer. I know first-hand the level of access that ISPs have to customer data, and the gravity of that access. We have a mantra at DataYard, “with great power comes great responsibility”, attributed to either Voltaire or Ben Parker, depending on who you ask. It is incredibly true in this and many other industries and vocations, but as more and more of our daily lives are driven online…well, ours is a unique business. We at DataYard make it our practice to log only the data we need to maintain our systems and provide the best customer service to our clients. We’ve got a database with your address in it, but so does Trader Joe’s.

If you are a business owner, work with Intellectual Property (IP) or Personally Identifiable Information (PII), are a HIPAA covered entity, or simply don’t want your personal preferences and business browsing data tracked and categorized – this new reality is an uncomfortable one. When ISPs begin to track, store, and replicate this personal data, it exponentially increases the potential attack footprint for malicious access. We’ve all heard about the Target / Yahoo / Verizon / [insert name here] hacks. Can you imagine the fallout if those companies had the last four years of your Internet usage stored and indexed for the taking?

We at DataYard want to publicly voice our disapproval of these legislative actions, undertaken with the sole purpose of opening new profit centers in an exploding industry. We know better than most the implications this decision has. It’s our business to know. Every customer we work with can rest assured that DataYard is not, and will not be, interested in the collection or sale of your communications and activities.

In a time when every move is tracked, every bit is stored forever, and everything is for sale, promising to forgo those profits is a radical move. But it’s a promise we make proudly.

See more: Dayton Daily News story here.

DataYard’s Privacy Policy:

https://www.datayard.us/about/policies/open-internet-compliance-statement/

How do I configure my Android phone to work with Connect mail?

Follow the guide below to set up POP/IMAP email on an Android device.

Step 1: Go to “Apps“.
Step 2: Go to “Email”.
Step 3: Click on the Menu” button.
Step 4: Go to “Settings“.
Step 5: Click on “+ Add An Account“. (You may have to select Add New Account again depending on you phone app)
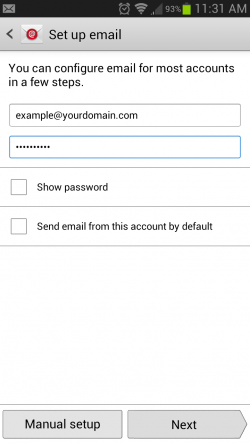
Step 6: Enter your full email address and password for the email account.

android setup

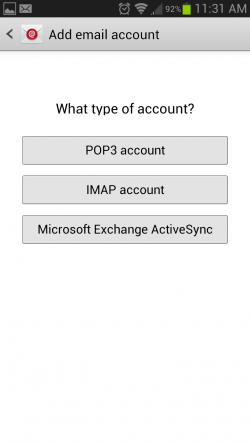
Step 7: After hitting “Manual Setup” you will select the desired protocol.

android account type

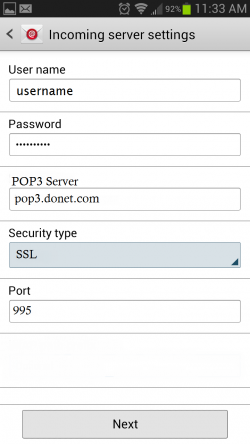
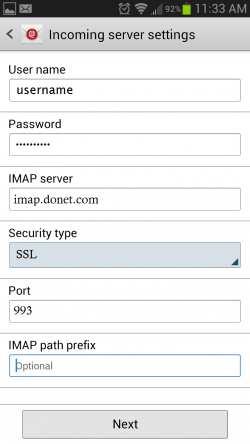
Step 8: Enter in our mail server information. For POP/IMAP server enter pop3.donet.com or imap.donet.com and for username enter your username given to you by DataYard. Example “carri.test”. If the password field is not filled in, re-enter it again.  Select Port 995 for inbound POP. Select Port 993 for inbound IMAP port. 

android incoming_pop                                                          android incoming_imap

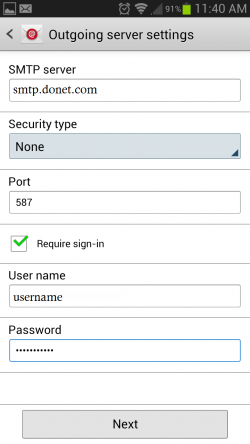
Step 9: Enter in our mail server information. For the host SMTP server enter smtp.donet.com and for username enter your username supplied by DataYard.  If the password field is not filled in, re-enter it again. Select Port 587 for outbound server.

android outgoing


Step 10: Select “Next”.  Proceed to the following steps on screen.  These setting are your personal preferences.


Outlook 2016 IMAP not synching Inbox

Outlook 2016 IMAP not synching Inbox

Symptoms:

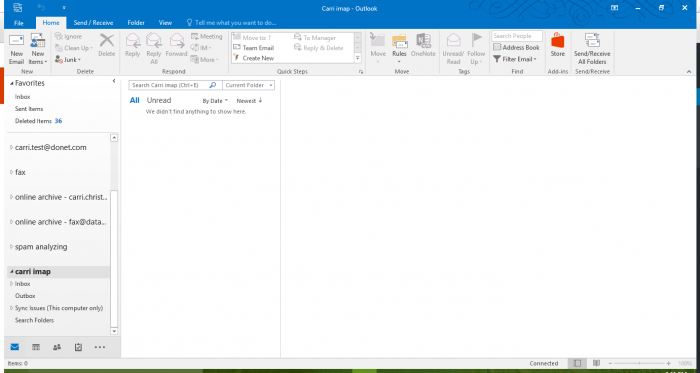
Outlook 2016 is only pulling emails from subfolders. Inbox is empty.

Solution 1:

In Mail, in the Navigation Pane, right-click the top folder for your IMAP account.

1

Click IMAP Folders…

2

Click Query.

3

Click a folder, and then click Unsubscribe.

5

Click a folder, and then click Subscribe.

6

Click Apply

Click OK

If this solution doesn’t work for you try the following.

Solution 2:

Check if the path to your Inbox is set in your Outlook 2016 settings.
To set the root folder path for your IMAP account:

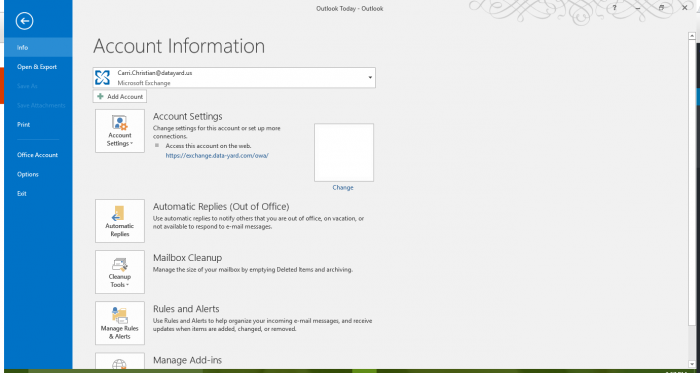
File-> Account Settings-> Account Settings…

7

Double click on your IMAP account.

9

Select More Settings…

10

Select Advanced Tab

11

Option: Root folder path

Setting this to “Inbox” will do the trick.

12

Click OK and close all of the opened dialog boxes.


Step –by-step Connecting to AnyConnect VPN

In your web browser enter VPN server URL (ex:  https://vpn.yourdomain.com)

Enter your AnyConnect Username and Password

Select Logon

1

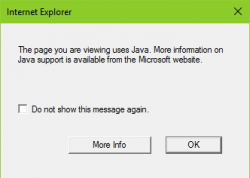
If Java is not detected Select OK

2

3

Select the link Windows 7/Vista/64/XP

4

Click the downloaded file at the bottom of the screen

5

Select Run

6

Select Next

7

Select radio button for “I accept the terms in the License Agreement

Select Next

8

Select Install

9 10

Select Finish

11


Go to the Start button in the bottom left corner of your PC

12or  13


Select All Apps for Windows 10 or 8 or All Programs for Windows 7

14

Select Cisco AnyConnect Mobility Client

15

Enter VPN server URL (ex:  https://vpn.yourdomain.com)

Select Connect

16

Enter AnyConnect Username and Password

Select OK

17

 Congratulations you are connected!!!!!

Outlook 2010 starting in Safe Mode

If you are experiencing an issue with your Outlook 2010 starting in Safe Mode after running Windows Updates on or after 12/8/2015, here are the steps to resolve this problem.

Uninstall the KB3114409 Outlook 2010 update:

  1. Open Installed Updates by clicking the Start button Picture of the Start button Outlook 2010 fix, clicking Control Panel, clicking Programs, and then, under Programs and Features, clicking View installed updates.
  2. Select the update KB3114409 to remove, right click, then click Uninstall. Administrator permission required for Outlook 2010 fix If you’re prompted for an administrator password or confirmation, type the password or provide confirmation. (If you have an issue finding it in the list you can use the search in the top right of the screen)
  3. Restart Computer.
  4. Open Outlook 2010.

If you are asked if you would like to start in Safe Mode, select NO and delete the shortcut you launched Outlook from and add it back.


Discontinuing Control Panel Access

Discontinuing Control Panel Access

DataYard systems team will be discontinuing access to two hosting control panels as of 1/31/14.

discontinuedEverything that has a beginning has an end… and we are sorry to inform you that we will no longer be offering two hosting control panels in https://controlpanel.donet.com:8443/ and https://controlpanel2.donet.com:8443/.

You may be asking yourself “Why this? Why now? How will we survive? Where are my car keys?”

We are doing this to address security concerns and to reduce costs of our legacy shared hosting platforms.

We can’t help with the car keys, but we can help with any of your needs for sites and mailboxes hosted on these platforms.

Please don’t hesitate to call us at 937-226-6896 or emailing [email protected]. We will make sure that what you need done gets done.

How can I connect to my DataYard VPN tunnel?

How can I connect to my DataYard VPN tunnel?

If you have services provided to you by DataYard that allow you connect via VPN, this walk through will take you through the setup of your VPN client.

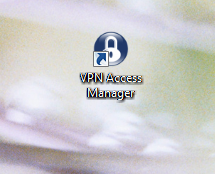
We recommend Shewsoft VPN Access Manager, which can be downloaded from their website: https://www.shrew.net/download/vpn.

VPN1


Once you have downloaded the client, you will first need to import the .pcf or .vpn file provided to you.

You will do this by going to File, Import and then browse your computer for the file.

VPN2

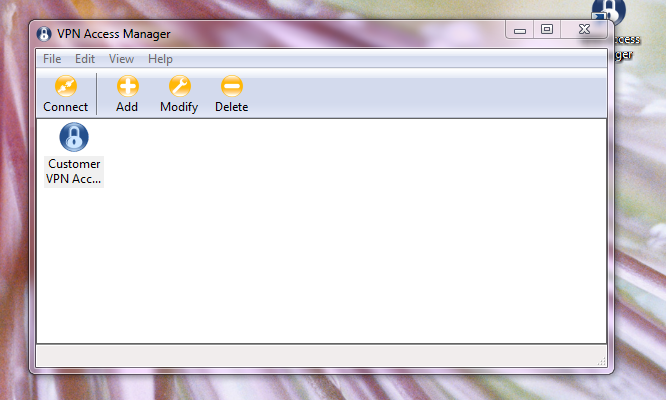
Once you have the file imported, you should see it in your main screen.

VPN3

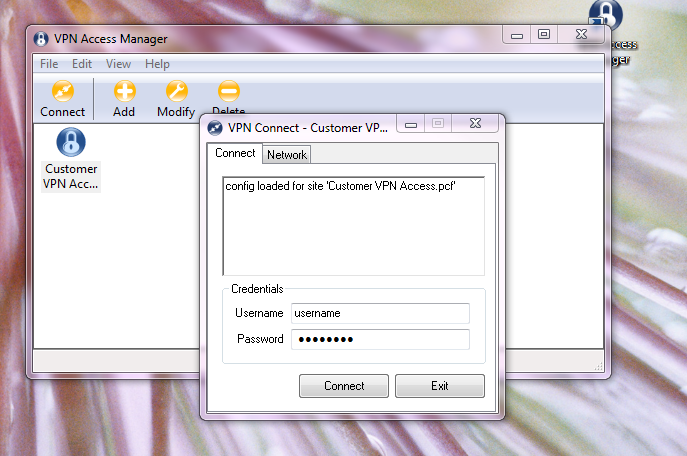
Now just click the file and choose ‘connect’

You should now be prompted for your username and password, this was provided to you by DataYard Staff.

VPN4

SPLA Licensing Explained

SPLA Licensing Explained

As Microsoft partner and service provider, DataYard has the ability to provide Microsoft software licenses for our VIP and VDC services through a Service Provider License Agreement (SPLA) program.

This licensing model differs from traditional Microsoft licensing models in several areas.

In this article we explain how consumers typically purchase Microsoft licensing, explain how the SPLA program differs, provide a pricing comparison, and briefly explain other licensing types.

If at any time this becomes overwhelming, which dealing with Microsoft licensing has the tendency to do, please feel free to contact us for more information regarding our VIP service and SPLA licensing by emailing [email protected] or calling 1-800-982-4539.

OEM and FPP license models

Typically consumers and businesses purchase Microsoft licenses for server software and applications through an OEM license of as a Full Packaged Product (FPP). When purchasing software through these licensing models; a license is bought for the software itself (now considered per processor with Windows Server 2012) AND Client Access Licenses (CAL). Every user or device that accesses or uses the Windows Server software requires the purchase of a Windows Server Client Access License (Windows Server CAL). Additionally, if a Microsoft application such as Exchange Server 2013 is utilized, a license for that software needs to be purchased as well as CALs for that specific application.

SPLA Licensing

With our SPLA program, we can offer you a much simpler pricing model. DataYard customers have the ability to take advantage of a “Windows Server License” which is one flat fee of $24/month regardless of the configuration. The only caveat to this licensing model is for those wishing to take advantage of Remote Desktop Services (RDS – formerly Terminal Services); which incurs additional licensing costs in the form of a Windows RDS SAL ($4.50/month per user).

With SPLA, the software usage is reported on a monthly basis. A nicety of this model is that you only pay for the number of licenses that are actually being utilized. Additionally, consumers of the SPLA licensing model receive software assurance, allowing upgrades of software to the latest versions at no additional cost. Also, as you can see in the pricing comparison below, paying the upfront costs for licensing can require a significant capital expenditure.

Pricing Comparison

Below is an approximation for licensing costs based on traditional licensing programs and the SPLA program. In this scenario, we will be licensing an Exchange Server for a Small business with 10 mailboxes:

Purchase from Vendor or Manufacturer

  1. Windows Server Standard Edition (includes 1 CALs) – $969
  2. Windows Server Additional CALs – $39 per CAL
  3. Exchange Server Standard – $645
  4. Exchange Server CAL – $71 per CAL

*For a business with 10 employees, this will cost $2,714 for licensing.

SPLA

  1. Windows Server License – $24
  2. Exchange Standard SAL – $2.60 per user

*For a business with 10 employees, this will cost $50/month

Conclusion

If you do the math, the point in time where the two programs become equivalent would happen at approximately 34 months in this scenario. However, every scenario is different. After that point in time the SPLA pricing would actually exceed purchasing the licenses through OEM, FPP, etc.

Please keep in mind that our VIP service also offers physical redundancy. Therefore, you can take the outright licensing costs and double them or even triple them if you are going to build a redundant cluster of your own, making our VIP service very appealing. For more information regarding pricing, please contact our sales department.


More reading: Microsoft License Types Explained

Full Packaged Product
Full packaged product (FPP) refers to the shrink-wrapped box of licensed software sold through the distribution channel to resellers. The consumer usually acquires the product from a reseller. Each FPP generally contains one license per box, along with media and documentation, and is designed to meet low-volume needs.

OEM System Builder
An original equipment manufacturer (OEM) system builder is usually a computer manufacturer who sells their hardware with preinstalled software. An OEM license is often the easiest and most economical way for customers to receive their Windows operating system software.

Downloaded Software for Consumers
Customers can obtain some types of software by downloading them from the Microsoft Download Center. The downloaded software is subject to the usage restrictions of the online end-user license terms, which is displayed when the software is being downloaded.

Microsoft Volume Licensing
Microsoft Volume Licensing programs serve the needs of organizations that acquire multiple licenses, but don’t need multiple copies of the media and the documentation, and don’t want to keep track of numerous individual end-user license terms. Volume Licensing offers the potential for substantial savings, ease of deployment, flexible acquisition, varied payment options, and other benefits such as ongoing maintenance.

Microsoft Solution Provider Agreement
The Microsoft Solution Provider Agreement (SPA) grants resellers the right to place orders with a Microsoft Regional Operations Center for certain Microsoft business-management solutions software licenses and related services. This is the only way resellers can distribute Microsoft Dynamics licenses.

How can I manage my Windows Fusion site using Core FTP?

How can I manage my Windows Fusion site using Core FTP?

How to install and use coreFTP to manage your Windows Fusion website.

Along with IIS 7 Manager and WebMatrix, Windows Fusion also offers FTP capabilities. Below you will find information on how to connect and manage content with Core FTP.

If you do not already have a copy of Core FTP, it can be downloaded here http://www.coreftp.com/download.html

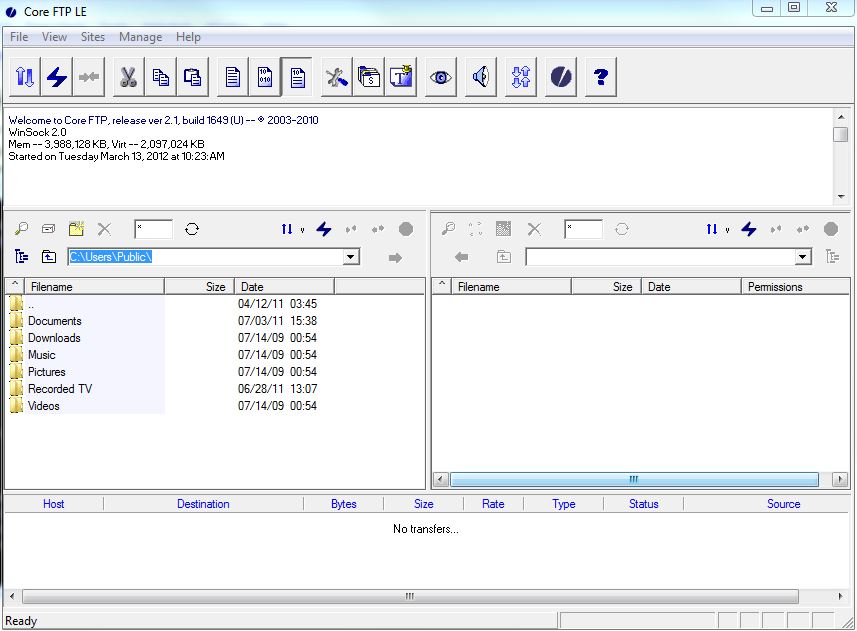
Once installed, open it up. You should see something like this:

uploadCoreFTP1

The folders on the left are the folders on your local machine.

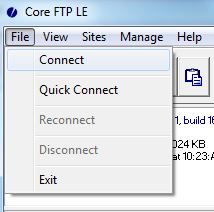
Now, click on File followed by Connect.

uploadCoreFTP2

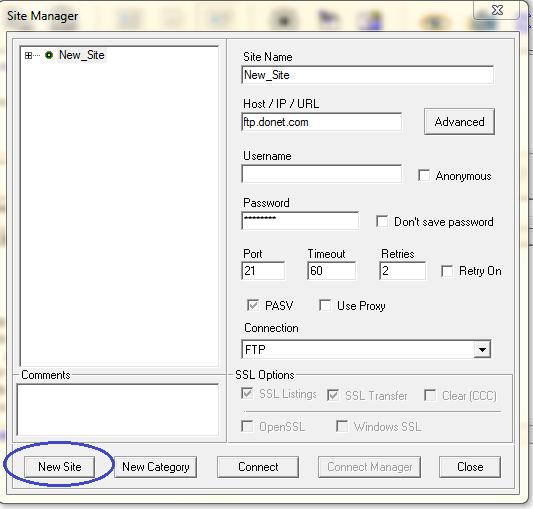
This will open up the Site Manager window. Click on New Site.

uploadCoreFTP3

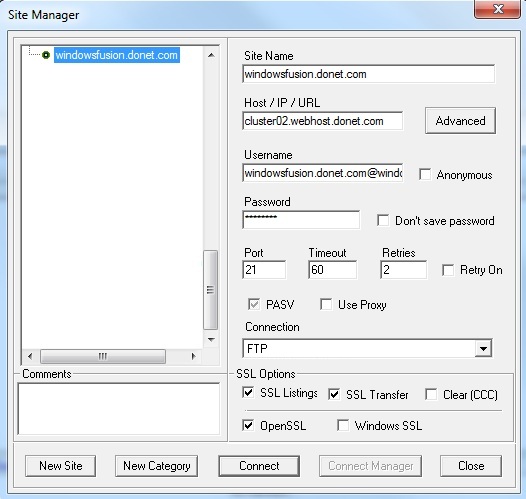
A new, unnamed site should have been added to the list on the left side. You should now name your site and fill in your FTP connection information.  Try to avoid naming it “my website” or anything like that to avoid confusion (especially if you manage multiple sites). For this example, my site’s name is ‘windowsfusion.donet.com’ so that’s what I named my site within Core FTP. Here’s what the completed FTP connection looks like:

uploadCoreFTP4

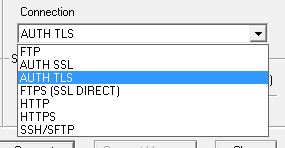
Another great thing about Windows Fusion is that, if you want to use an encrypted connection, you can! To enable this feature in Core FTP, select “Auth TLS” from the Connection drop-down menu.

uploadCoreFTP5

After clicking Connect, you will be connected to the web server, and the directories belonging to your user name will appear on the right side of Core FTP (your local desktop will be on the left).

The /php directory is where the PHP configuration (php.ini file) is stored, the /www directory is where you will upload your site content, and the rest of the directories can be ignored unless otherwise instructed.

For additional documentation, FAQs, tutorials, etc., please visit the Core FTP website.

If you have any questions or concerns please contact DataYard support.

How can I restore my files from my server or VIP with Ready backup?

How can I restore my files from my server or VIP with Ready backup?

Restoring files from Ready Backup using the Ready client installed on your server.

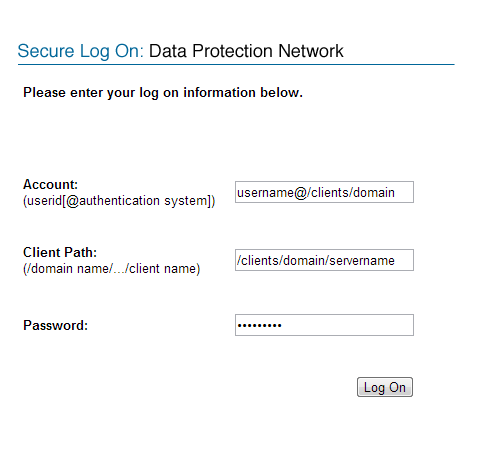
You will need to have the following information available, which was provided to you in your Welcome Letter.

Web Portal URL: https://ready.datayardworks.com

restoreFromReadyServer1

Username: username@/clients/domain
Client Path: /clients/domain/servername
Password: The password provided to you

You will first use the above information to log into the Avamar portal at https://ready.datayardworks.com

Once logged in you will see the following on your home screen:

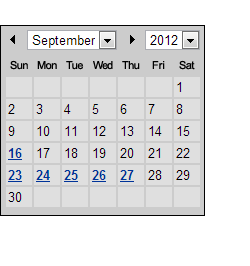
Calendar

This calendar shows you all of the available dates that have restore points for your files.

For example, this calendar shows the following dates have available restores: September 16th, September 23rd, September 24th, September 25th, September 26th, and September 27th.

restoreFromReadyServer2

restoreFromReadyServer3

This will vary from server to server, so don’t worry if yours does not look exactly as the one shown.

As you select a backup by sequence number below you will see the corresponding directories that are available for backup from that backup. Once you see the backup showing the drive you wish to restore from you will select that drive.

restoreFromReadyServer4

After selecting the drive, you will then see a list of all files that are available for download

restoreFromReadyServer5

Selecting the blue arrow icon will download this file to your local PC.

restoreFromReadyServer6

From there you can restore the files to the appropriate directories needed to replace lost data.

Please Note the following

  • If you are trying to restore a file or directory that is larger than 1GB you will be unable to do so using this service. If you are unable to restore the file yourself, please contact DataYard support.
  • Downloading the file from this service does not automatically restore the file; you are only downloading it to your local PC and still must upload the file where necessary.