How can I add an E-Mail address for a new employee?

New e-mail accounts can be created for you, as needed by DataYard staff.

The following information will be needed to create the account for you:

  • Requested username
  • Alias, if applicable (for example [email protected])
  • Requested password. If you do not have one chosen we can generate a random password for the account.

SPLA Licensing Explained

SPLA Licensing Explained

As Microsoft partner and service provider, DataYard has the ability to provide Microsoft software licenses for our VIP and VDC services through a Service Provider License Agreement (SPLA) program.

This licensing model differs from traditional Microsoft licensing models in several areas.

In this article we explain how consumers typically purchase Microsoft licensing, explain how the SPLA program differs, provide a pricing comparison, and briefly explain other licensing types.

If at any time this becomes overwhelming, which dealing with Microsoft licensing has the tendency to do, please feel free to contact us for more information regarding our VIP service and SPLA licensing by emailing [email protected] or calling 1-800-982-4539.

OEM and FPP license models

Typically consumers and businesses purchase Microsoft licenses for server software and applications through an OEM license of as a Full Packaged Product (FPP). When purchasing software through these licensing models; a license is bought for the software itself (now considered per processor with Windows Server 2012) AND Client Access Licenses (CAL). Every user or device that accesses or uses the Windows Server software requires the purchase of a Windows Server Client Access License (Windows Server CAL). Additionally, if a Microsoft application such as Exchange Server 2013 is utilized, a license for that software needs to be purchased as well as CALs for that specific application.

SPLA Licensing

With our SPLA program, we can offer you a much simpler pricing model. DataYard customers have the ability to take advantage of a “Windows Server License” which is one flat fee of $24/month regardless of the configuration. The only caveat to this licensing model is for those wishing to take advantage of Remote Desktop Services (RDS – formerly Terminal Services); which incurs additional licensing costs in the form of a Windows RDS SAL ($4.50/month per user).

With SPLA, the software usage is reported on a monthly basis. A nicety of this model is that you only pay for the number of licenses that are actually being utilized. Additionally, consumers of the SPLA licensing model receive software assurance, allowing upgrades of software to the latest versions at no additional cost. Also, as you can see in the pricing comparison below, paying the upfront costs for licensing can require a significant capital expenditure.

Pricing Comparison

Below is an approximation for licensing costs based on traditional licensing programs and the SPLA program. In this scenario, we will be licensing an Exchange Server for a Small business with 10 mailboxes:

Purchase from Vendor or Manufacturer

  1. Windows Server Standard Edition (includes 1 CALs) – $969
  2. Windows Server Additional CALs – $39 per CAL
  3. Exchange Server Standard – $645
  4. Exchange Server CAL – $71 per CAL

*For a business with 10 employees, this will cost $2,714 for licensing.

SPLA

  1. Windows Server License – $24
  2. Exchange Standard SAL – $2.60 per user

*For a business with 10 employees, this will cost $50/month

Conclusion

If you do the math, the point in time where the two programs become equivalent would happen at approximately 34 months in this scenario. However, every scenario is different. After that point in time the SPLA pricing would actually exceed purchasing the licenses through OEM, FPP, etc.

Please keep in mind that our VIP service also offers physical redundancy. Therefore, you can take the outright licensing costs and double them or even triple them if you are going to build a redundant cluster of your own, making our VIP service very appealing. For more information regarding pricing, please contact our sales department.


More reading: Microsoft License Types Explained

Full Packaged Product
Full packaged product (FPP) refers to the shrink-wrapped box of licensed software sold through the distribution channel to resellers. The consumer usually acquires the product from a reseller. Each FPP generally contains one license per box, along with media and documentation, and is designed to meet low-volume needs.

OEM System Builder
An original equipment manufacturer (OEM) system builder is usually a computer manufacturer who sells their hardware with preinstalled software. An OEM license is often the easiest and most economical way for customers to receive their Windows operating system software.

Downloaded Software for Consumers
Customers can obtain some types of software by downloading them from the Microsoft Download Center. The downloaded software is subject to the usage restrictions of the online end-user license terms, which is displayed when the software is being downloaded.

Microsoft Volume Licensing
Microsoft Volume Licensing programs serve the needs of organizations that acquire multiple licenses, but don’t need multiple copies of the media and the documentation, and don’t want to keep track of numerous individual end-user license terms. Volume Licensing offers the potential for substantial savings, ease of deployment, flexible acquisition, varied payment options, and other benefits such as ongoing maintenance.

Microsoft Solution Provider Agreement
The Microsoft Solution Provider Agreement (SPA) grants resellers the right to place orders with a Microsoft Regional Operations Center for certain Microsoft business-management solutions software licenses and related services. This is the only way resellers can distribute Microsoft Dynamics licenses.

Should Have Hosted with DataYard, Powerball Fail

Should Have Hosted with DataYard – 11/29/2012

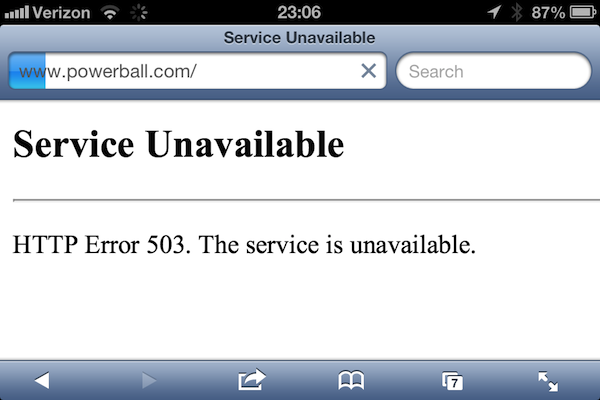
Last night, the Powerball jackpot hit $550 million. Two lucky people had the winning numbers. Too bad the Powerball web servers couldn’t handle the traffic.

powerball-503-600x

Open House — Under the Hood at DataYard

Open House at DataYard

On November 9, 2012, we hosted an Open House at our new facility. We called it our “Under the Hood” tour, and gave our visitors a chance to see what makes our new facility, particularly our new Data Center, tick.

Below are some select photos from the event.

openhouse2 openhouse1
openhouse3 openhouse4

What are the Mail Settings for my DataYard Account?

What are the Mail Settings for my DataYard Account?

How to configure any mail client with your DataYard e-mail.

If you are setting up Outlook: Outlook 2013/2016Outlook 2010 or Outlook 2007
If you are setting up Mozilla Thunderbird: Mozilla Thunderbird
If you are setting up Mac Mail: Mac Mail 10.8
If you are setting up an iPhone: iPhone 4, 4S, 5, 5C, 5S, or 6 (any)
If you are setting up an Android phone:  Android

If you are setting up any device that is not listed above the following settings should be all you need to get your e-mail working. Please note that actual setup will vary by device and version.

The settings needed for a POP account are as follows:

Email address: this is your full e-mail address
Username:  the username provided to you by DataYard
Password:  your e-mail password
Incoming mail server:  pop3.donet.com
Outgoing mail server:  smtp.donet.com
Outgoing server authentication:  enabled/password or use same settings as incoming mail server
Incoming server port number:  995
Use the following type of encrypted connection: SSL
Outgoing server port number:  587
Use the following type of encrypted connection: TLS


Mail Settings for using IMAP accounts are as follows:

Email address: this is your full e-mail address
Username:  the username provided to you by DataYard
Password:  your e-mail password
Incoming mail server:  imap.donet.com (or pop3.donet.com) they both point to the same server.
Outgoing mail server:  smtp.donet.com
Outgoing server authentication:  enabled/password or use same settings as incoming mail server
Incoming server port number:  993
Use the following type of encrypted connection: SSL
Outgoing server port number:  587
Use the following type of encrypted connection: TLS


How can I test my Ethernet Express connection to see if it’s up?

How can I test my Ethernet Express connection to see if it’s up?

Please, do not reboot any managed devices on site. If you think your service is down or degraded, the quickest resolution would be to contact DataYard technical support.

Here are some recommended ways to confirm connectivity to the internet. This information would also be helpful to have ready for our technical support team when calling in:

  • Check multiple web sites (like facebook.com and google.com).

If any other sites come up correctly, the site you originally tried may be having trouble.

  • Check another workstation/device on the network for the ability to browse.

If they can browse, the trouble may be isolated to your workstation.

  • Ping a known public host address (run: ping www.yahoo.com and confirm a “Reply from” response).

If you get a good “Reply from” (shown below), there may be something wrong with browsing (possibly proxy or firewall).

testConnection1

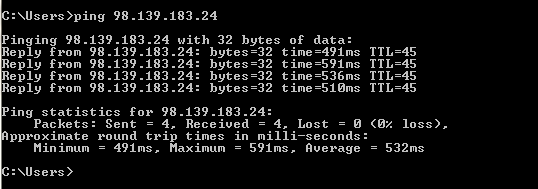
  • Ping a known public IP address (run: ping 98.139.183.24 and confirm a “Reply from” response).

If this works (meaning your Ethernet Express connection is working), you may have something wrong with your DNS

testConnection2

  • Check your internal switch and/or firewall devices for proper lights (power and traffic).

If those devices look like they have power and are taking traffic, you should contact DataYard support.

How can I manage my Windows Fusion site using Core FTP?

How can I manage my Windows Fusion site using Core FTP?

How to install and use coreFTP to manage your Windows Fusion website.

Along with IIS 7 Manager and WebMatrix, Windows Fusion also offers FTP capabilities. Below you will find information on how to connect and manage content with Core FTP.

If you do not already have a copy of Core FTP, it can be downloaded here http://www.coreftp.com/download.html

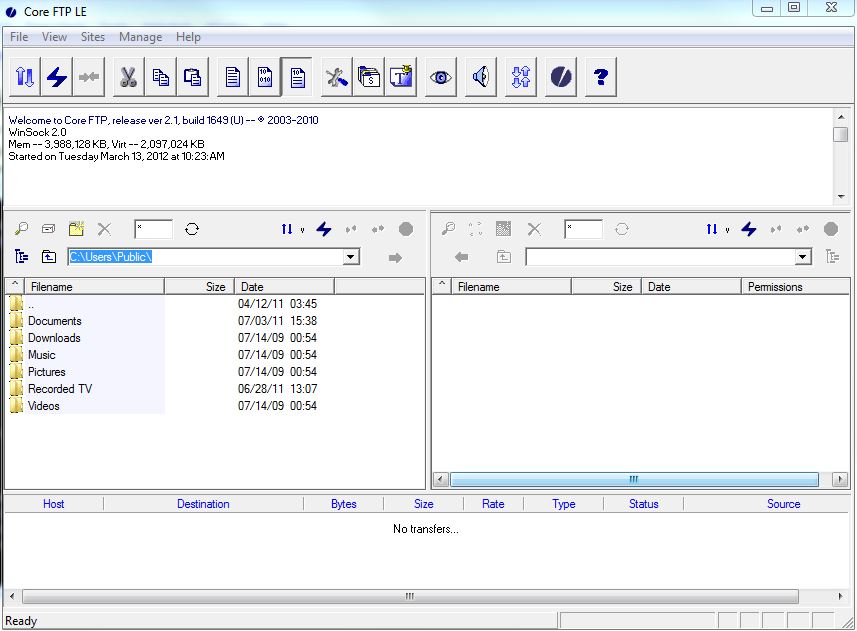
Once installed, open it up. You should see something like this:

uploadCoreFTP1

The folders on the left are the folders on your local machine.

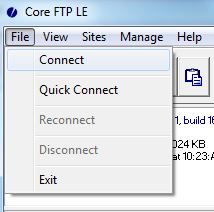
Now, click on File followed by Connect.

uploadCoreFTP2

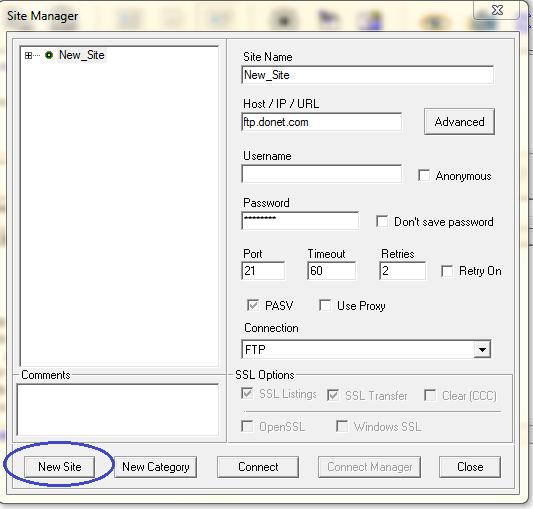
This will open up the Site Manager window. Click on New Site.

uploadCoreFTP3

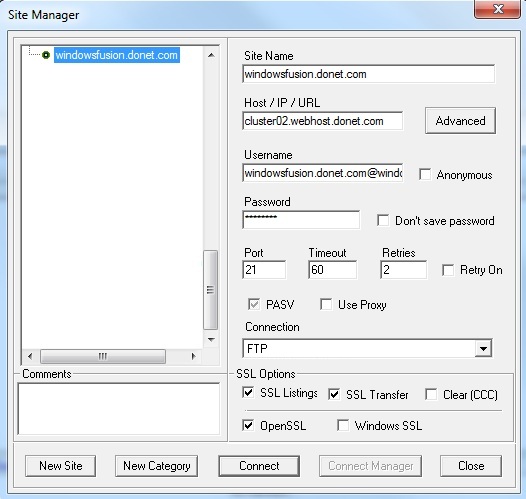
A new, unnamed site should have been added to the list on the left side. You should now name your site and fill in your FTP connection information.  Try to avoid naming it “my website” or anything like that to avoid confusion (especially if you manage multiple sites). For this example, my site’s name is ‘windowsfusion.donet.com’ so that’s what I named my site within Core FTP. Here’s what the completed FTP connection looks like:

uploadCoreFTP4

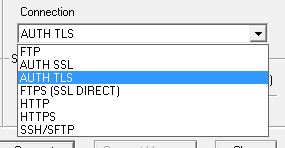
Another great thing about Windows Fusion is that, if you want to use an encrypted connection, you can! To enable this feature in Core FTP, select “Auth TLS” from the Connection drop-down menu.

uploadCoreFTP5

After clicking Connect, you will be connected to the web server, and the directories belonging to your user name will appear on the right side of Core FTP (your local desktop will be on the left).

The /php directory is where the PHP configuration (php.ini file) is stored, the /www directory is where you will upload your site content, and the rest of the directories can be ignored unless otherwise instructed.

For additional documentation, FAQs, tutorials, etc., please visit the Core FTP website.

If you have any questions or concerns please contact DataYard support.

How can I restore my files from my server or VIP with Ready backup?

How can I restore my files from my server or VIP with Ready backup?

Restoring files from Ready Backup using the Ready client installed on your server.

You will need to have the following information available, which was provided to you in your Welcome Letter.

Web Portal URL: https://ready.datayardworks.com

restoreFromReadyServer1

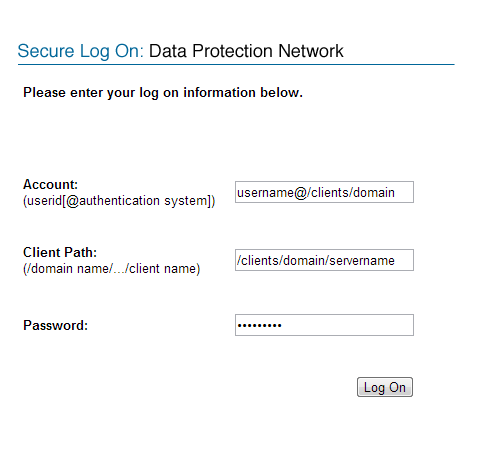
Username: username@/clients/domain
Client Path: /clients/domain/servername
Password: The password provided to you

You will first use the above information to log into the Avamar portal at https://ready.datayardworks.com

Once logged in you will see the following on your home screen:

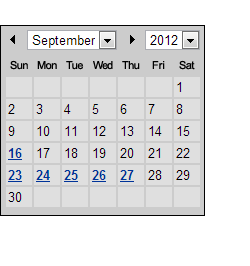
Calendar

This calendar shows you all of the available dates that have restore points for your files.

For example, this calendar shows the following dates have available restores: September 16th, September 23rd, September 24th, September 25th, September 26th, and September 27th.

restoreFromReadyServer2

restoreFromReadyServer3

This will vary from server to server, so don’t worry if yours does not look exactly as the one shown.

As you select a backup by sequence number below you will see the corresponding directories that are available for backup from that backup. Once you see the backup showing the drive you wish to restore from you will select that drive.

restoreFromReadyServer4

After selecting the drive, you will then see a list of all files that are available for download

restoreFromReadyServer5

Selecting the blue arrow icon will download this file to your local PC.

restoreFromReadyServer6

From there you can restore the files to the appropriate directories needed to replace lost data.

Please Note the following

  • If you are trying to restore a file or directory that is larger than 1GB you will be unable to do so using this service. If you are unable to restore the file yourself, please contact DataYard support.
  • Downloading the file from this service does not automatically restore the file; you are only downloading it to your local PC and still must upload the file where necessary.

How can I configure Mozilla Thunderbird to work with Connect Mail?

How can I configure Mozilla Thunderbird to work with Connect Mail?

How to configure Mozilla Thunderbird to download your DataYard email.

First, you will need to decide if you wish to set this account up as a POP account or an IMAP account, if you are unsure you can see the differences here and use the settings for your chosen account type.

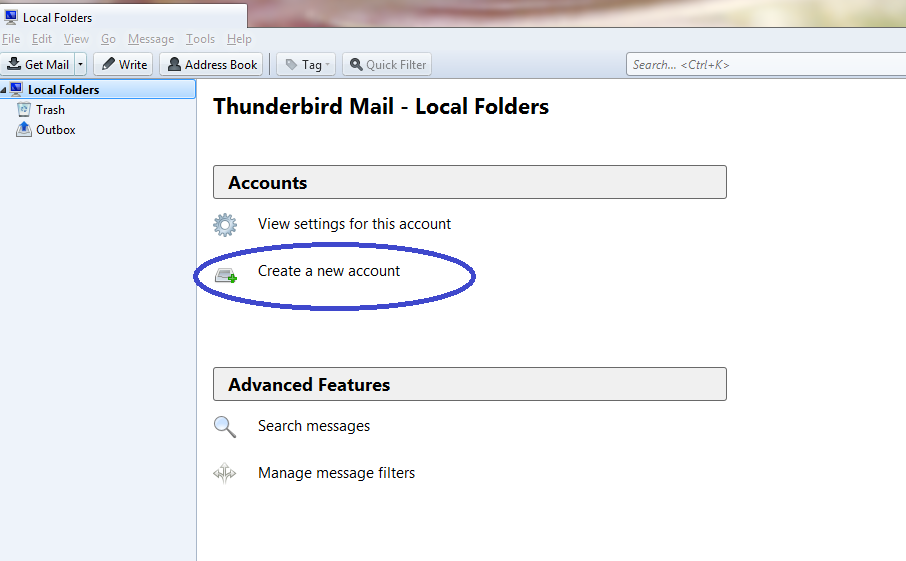
From the main screen after download, choose the option Create a New Account.

tbSetup1

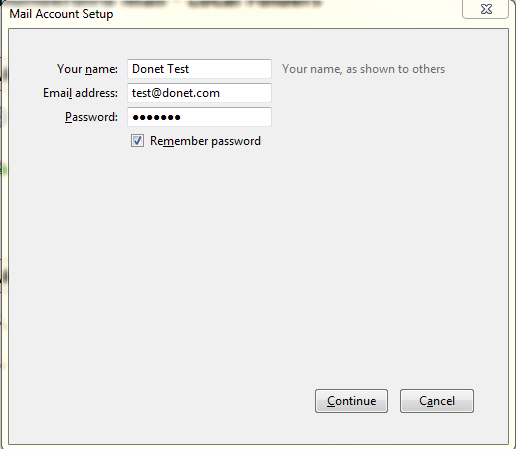
A new screen will pop up, you will enter:

Your Name: As you wish people to see it
Your E-mail Address: Your Full e-mail address
Password: The password provided to you

tbsetup2

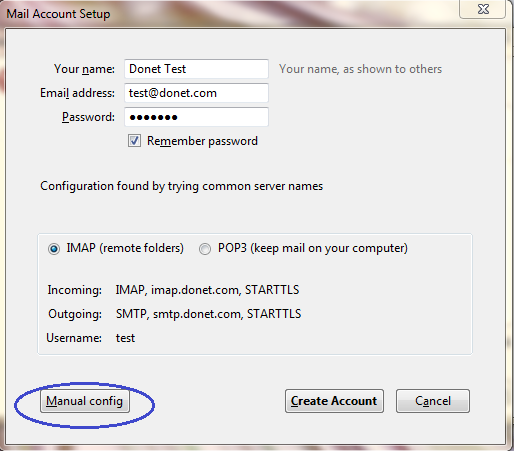
Once your information is entered, hit continue. This will start an automatic process that attempts to configure your mail client for you. Once it has completed, you will want to choose the option Manual Config.

tbsetup3

You will need to make sure on this screen that your settings match your chosen account type

POP3:

  • Incoming Server Information
  • Server Type: POP
  • Server Address: donet.com
  • Port: 995
  • SSL: Auto-detect
  • Authenticate: Auto-detect
  • Logon User Name: Your username
  • Outgoing Server Information
  • Server Address: smtp.donet.com
  • Port: 587
  • SSL: Auto-detect
  • Requires Authentication: Checked

OR

IMAP

  • Incoming Server Information
  • Server Type: IMAP
  • Server Address: imap.donet.com
  • Port: 993
  • Authenticate: Auto-detect
  • Logon User Name: Your username
  • Outgoing Server Information
  • Server Address: smtp.donet.com
  • Port: 587
  • SSL: Auto-detect

You will then want to select the button for test or re-test

Then hit Create Account. This will take you directly back to the main screen with no successful completion notification.

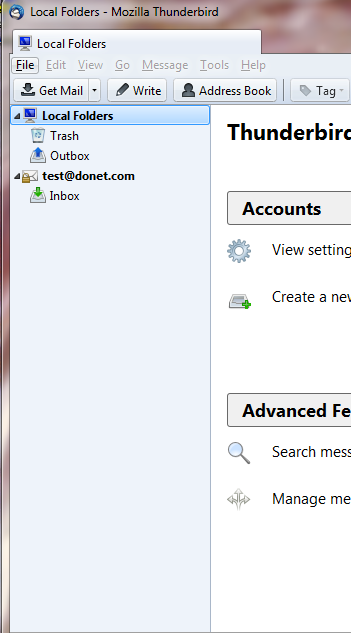
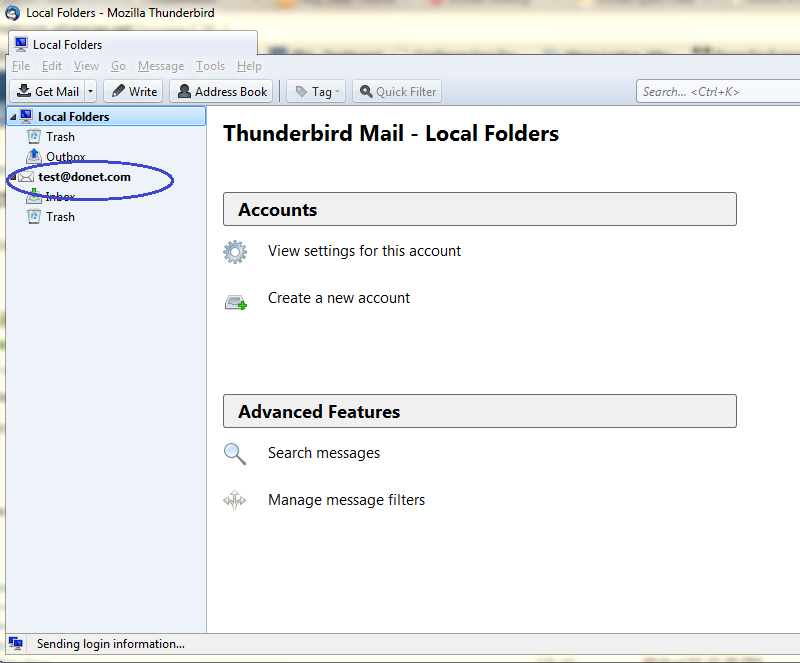
You can verify that the account is created by looking at the menu on the left hand side of the screen, you will see your email address listed

tbSetup6

tbSetup7


How can I manage my Windows Fusion site using Filezilla FTP?

How can I manage my Windows Fusion site using Filezilla FTP?

Along with IIS 7 Manager and WebMatrix, Windows Fusion also offers FTP capabilities. Below you will find information on how to connect and manage content with Filezilla.

If you do not already have a copy of FileZilla, it can be downloaded at http://filezilla-project.org/download.php/

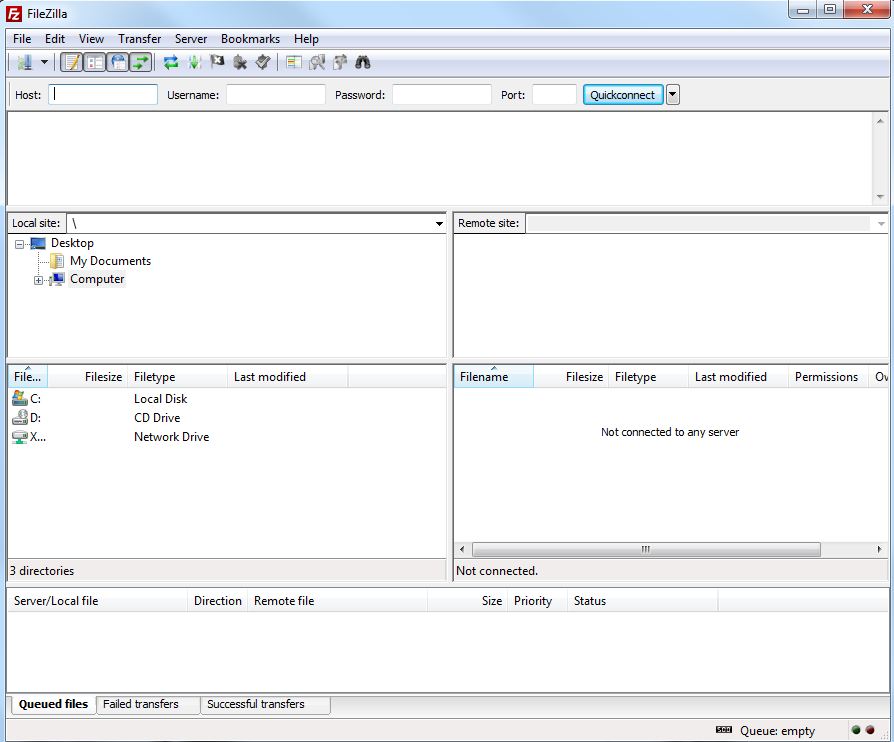
Once installed, open it up. It will look like this:

uploadFilezillaFTP1

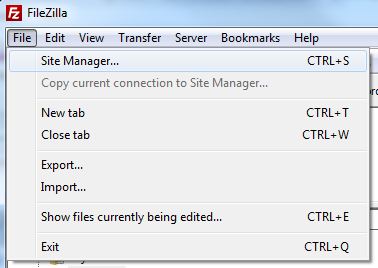
Now, click on File followed by Site Manager.

uploadFilezillaFTP2

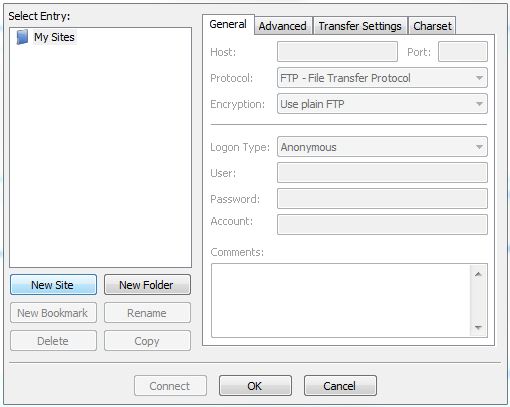
This will open up the Site Manager window. Click on New Site.

uploadFilezillaFTP3

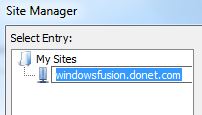
A new, unnamed site should have been added to the list on the left side underneath My Sites. You should now name your site. Try to avoid naming it “my website” or anything like that to avoid confusion (especially if you manage multiple sites). For this example, my site’s name is windowsfusion.donet.com, so that’s what I named my site within FileZilla

uploadFilezillaFTP4

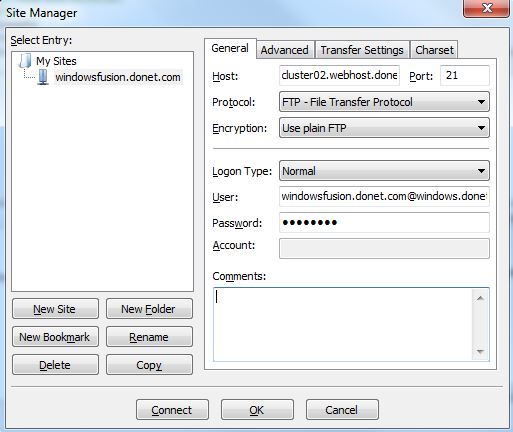
Now, you need to fill in the connection information.

You should have received this information from DataYard after signing up for Windows Fusion hosting, but if you lose that information, you forget it, you need to change it, etc., just give us a call. We will reset the information and send it to you.

Using my own login information along with the rest of the FTP information, here is what my FileZilla connection looks like for my site, windowsfusion.donet.com:

uploadFilezillaFTP5

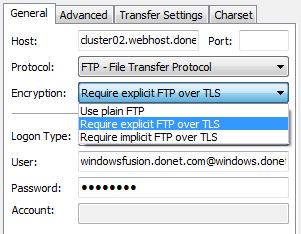
Another great thing about Windows Fusion is that, if you want to use an encrypted connection, you can! To enable this feature in FileZilla, select “Require explicit FTP over TLS” from the “Encryption” drop-down menu.

uploadFilezillaFTP6

After clicking Connect, you will be connected to the web server, and the directories belonging to your user name will appear on the right side of FileZilla (your local desktop will be on the left).

The /php directory is where the PHP configuration (php.ini file) is stored, the /www directory is where you will upload your site content, and the rest of the directories can be ignored unless otherwise instructed.

For additional documentation, FAQs, tutorials, etc., please visit Filezilla’s website.