Common Outlook errors: Unable to Connect to your mail server

Common Outlook errors: Unable to Connect to your mail server

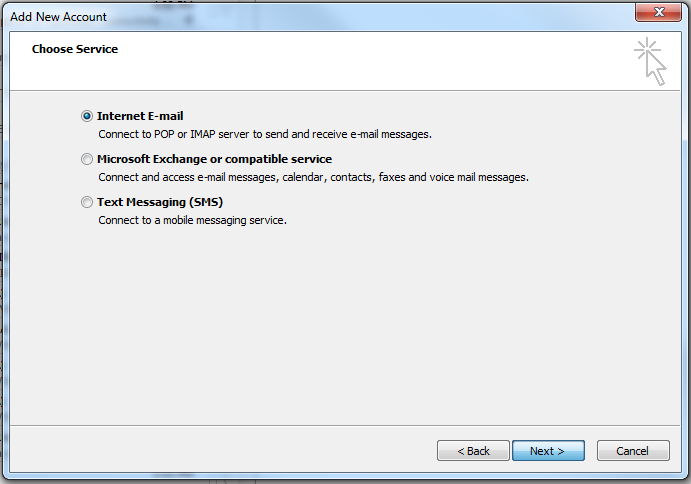
How to resolve the error ‘Outlook is unable to connect to your incoming (POP3) email server. If you continue to receive this message, contact your server administrator or Internet service provider (ISP)’

Associated error message:

Outlook is unable to connect to your incoming (POP3) email server. If you continue to receive this message, contact your server administrator or Internet service provider (ISP).

  • To resolve this issue, follow these steps for Outlook 2007 and 2010:
  • If you recently updated Office or Outlook it could have caused an issue. Verify that your mail settings were not changed by opening the mail settings for your account in your mail client and confirming that they are correct.
  • Restart your computer. Often the problem will then simply fix itself after a restart.
  • Disable your antivirus software*; then close your email program (by selecting, File>Exit), open it again, and try hitting the send/receive button.
    *This will vary by the type of software used, please contact your IT administrator for more help with this option.

If you are still unable to resolve your issue you can find more help on Microsoft’s website: http://support.microsoft.com/kb/813514 or Contact DataYard support for further assistance.

How can I configure Mac Mail 10.8 to work with Connect Mail?

How can I configure Mac Mail 10.8 to work with Connect Mail?

Configure your Mac Mail account to download your DataYard email.

First, you will need to decide if you wish to set this account up as a POP account or an IMAP account. If you are unsure, you can see the differences here and use the settings for your chosen account type

Mac Mail OS X 10.8 “Mountain Lion”

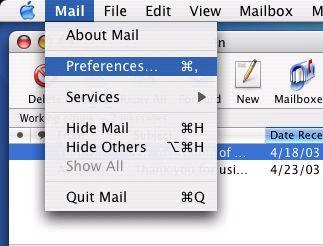
To add a new account in your Mac Mail App, you will first select Mail from the toolbar on the home screen then select Preferences.

macml1

From the accounts screen, select the Accounts icon.

macml2

Next select the + in the bottom right hand corner to add a new account.

macml3

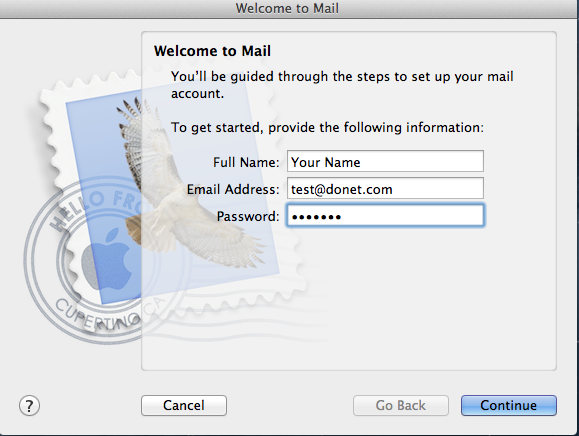
A new screen will pop open, titled “Welcome to Mail.”

  • Full Name: This is your full name as you wish people to see it
  • Email Address: Your full Email address
  • Password: The password for your email account

Then select Continue

macml4

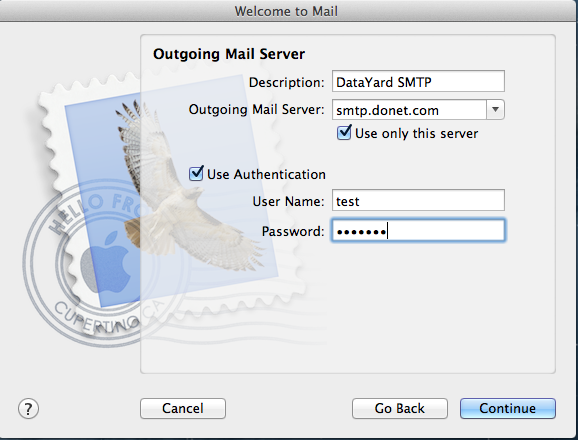
Outgoing Mail Server

  • Description: Enter a description for your account, for example DataYard SMTP. This can be anything that tells you which server you are using to send mail.
  • Outgoing Mail Server: smtp.donet.com
  • Use Authentication: Must be checked
  • Username: this is the username provided to you by DataYard. If you have an email address that is @donet.com your username is simply everything before the @ symbol. For Example: If your email address is [email protected] then your username is just ‘test’. If you have your own domain, your username may be different. This information was given to you when the account was created. If you do not know your username please, contact support.
  • Password: Your email password entered again.

Then select Continue

macml5

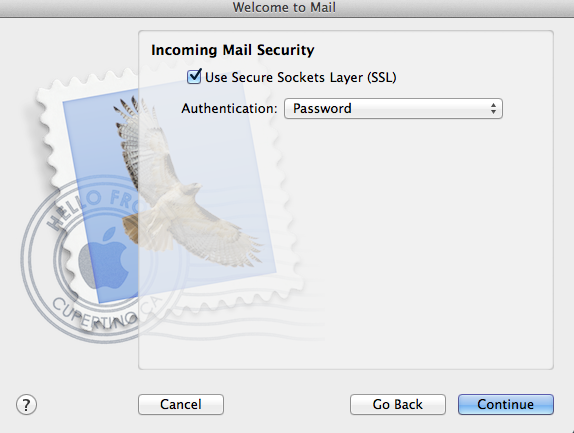
Incoming Mail Security

  • Use Secure Sockets Layer (SSL): Checked
  • Authentication: Password

Then select Continue

macml6

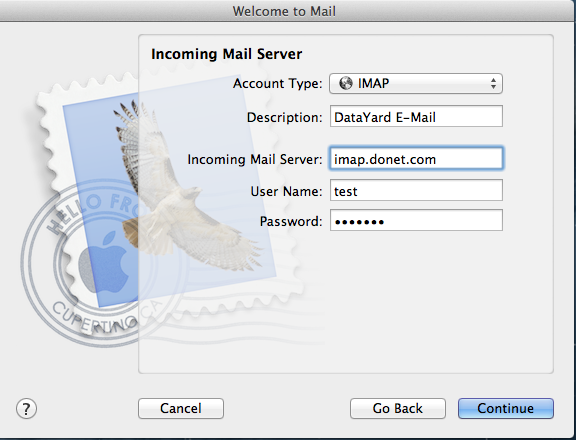
Incoming Mail Server

  • Account Type: POP or IMAP.
  • Description: Enter a description for your account, such as DataYard Email.
  • Incoming Mail Server: imap.donet.com or pop3.donet.com.
  • Username: this is the username provided to you by DataYard. If you have an email address that is @donet.com your username is simply everything before the @ symbol.
  • For Example: If your email address is [email protected] then your username is just ‘test’. If you have your own domain, your username may be different. This information was given to you when the account was created. If you do not know your username please, contact support
  • Password: Your email password entered again

Select Continue

macml7

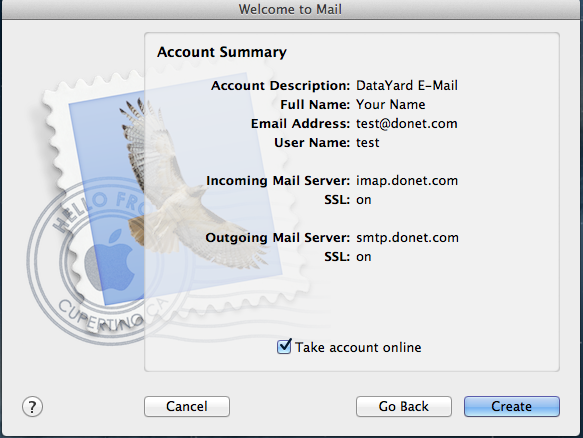
The last screen is a summary of all the information that you’ve entered, please verify it for accuracy.

Make sure to check Take Account Online.

If any changes need to be made, select Go Back.

or

If everything is correct, select Create.

macml8

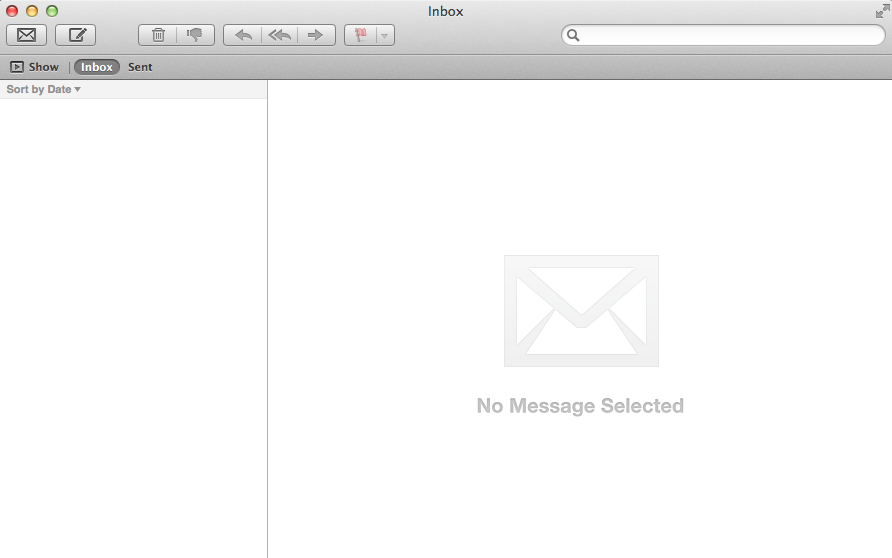
This will take you to your newly created, empty inbox.

macml9

How can I manage my DataYard spam filter?

How can I manage my DataYard spam filter?

Steps to managing your Spam Filter settings for you DataYard email account.

Browse to http://my.donet.com and choose the option ‘Email Filtering tools’ which is located on the right side of the screen under the ‘Configure your Email’ heading.

mangeSpamFilter1

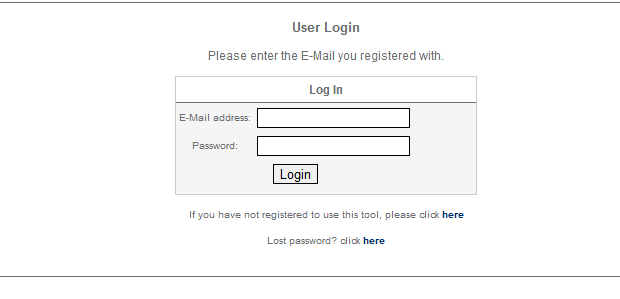
You will need log in information for this tool. If you were not already provided this information by the DataYard support team, you can register your email address from the log in page.

If you already have log in information enter it here. If not, you can register your email address now by clicking the link below the log in box.

mangeSpamFilter2

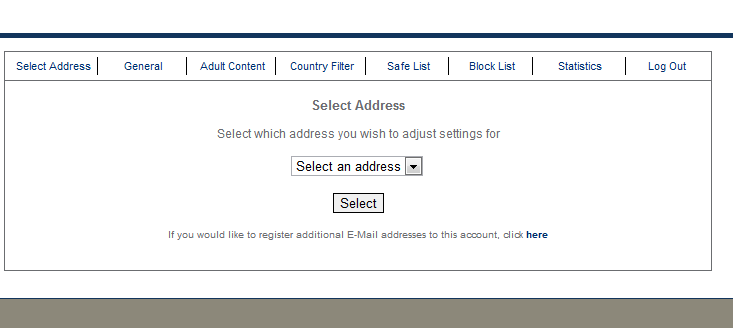
From one log in screen, you can manage multiple email accounts, this is specifically important for those who manage the spam filter for an entire domain.

Once logged in you will see a drop down menu listing the accounts you have control of managing the spam filter for. If you see ‘%@yourdomain.com’ this means you have the ability to manage for the entire domain.

Select your address or the domain from this list.

mangeSpamFilter3

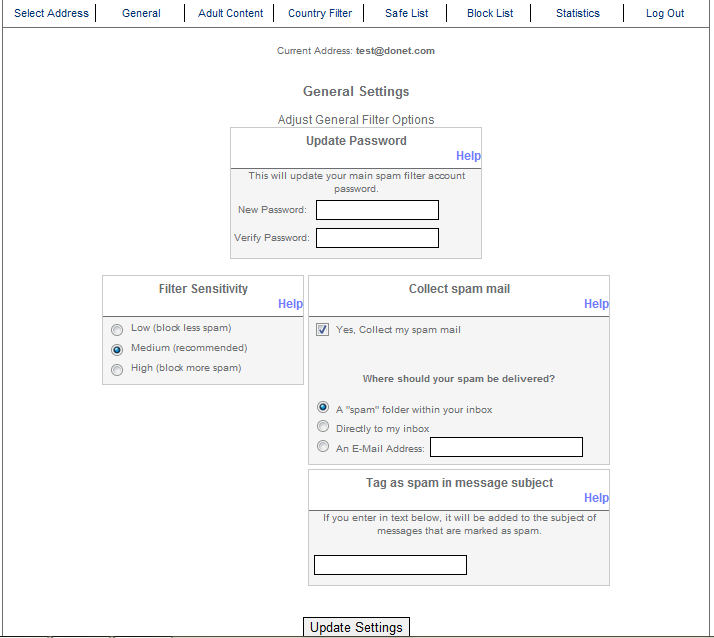
General Settings options:

Update Password:

This will modify the existing password you have for the spam filter tool, this does NOT change your email password.
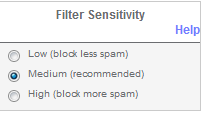
Filter Sensitivity:

  • Low: this is going to be the lowest setting possible; it will block the least amount of spam and allow things like solicitations to come through
  • Medium: This is the recommended setting; It will block junk mail but allow things like newsletters or other monthly subscribed emails to come through
  • High: This is the highest setting; this will block most spam but can also block messages you wanted to receive. Though if choosing this setting you can add things that do end up unintentionally blocked to your safe list (which we will discuss further later)

mangeSpamFilter4

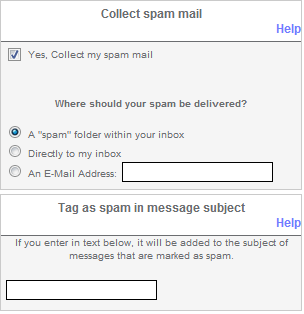
Collect Spam mail:

From here, you can decide where your spam should go.

Yes, collect my spam mail. We recommend leaving this setting checked. If you uncheck this box, messages that are considered spam will never reach you. This can cause problems if things you want are unintentionally marked as spam and never reach you.

Where should your spam be delivered?

  • A “spam” folder within your inbox: this will deliver spam messages to the spam folder within your webmail portal.
  • Directly to my inbox: This will deliver messages tagged as spam to your inbox
  • An Email address: You can choose to have all spam routed to on email address. This option gives you the ability to keep your spam all in one place but not have to deal with it every day.
    • Tag as spam in message subject: This will tag any messages marked as spam with a chosen phrase to identify the messages to you if they are routed to your inbox.

mangeSpamFilter5

Be sure to hit ‘update’ at the bottom of each screen after making any changes.

mangeSpamFilter6

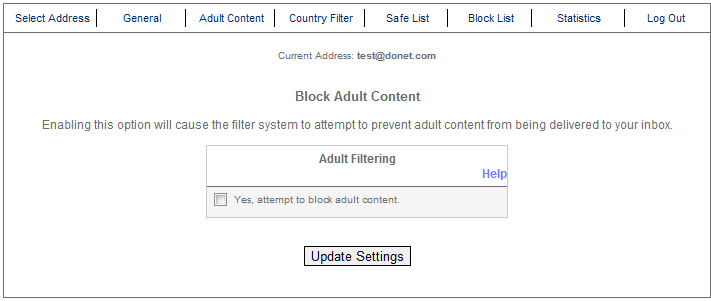
Adult Content:

This setting will allow you to block emails that contain inappropriate, adult related content in them. To enable, check the box that says ‘yes, attempt to block adult content.’

mangeSpamFilter7

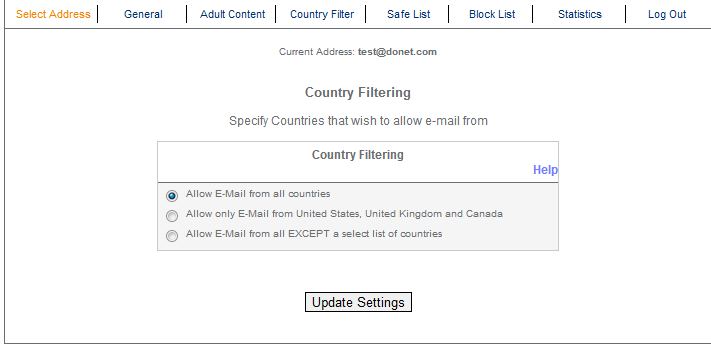
Country Filter:

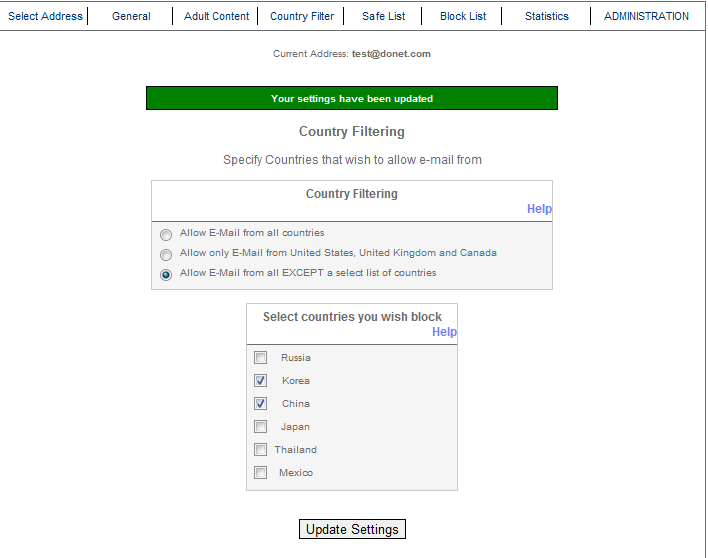
This filter allows you to choose to block messages from specific countries known for sending spam.

If choosing ‘allow Email from all EXCEPT a select list of countries’ all countries that you checkmark WILL be BLOCKED.

The following example shows all messages from Korea and China being blocked.

mangeSpamFilter9

Safe List:

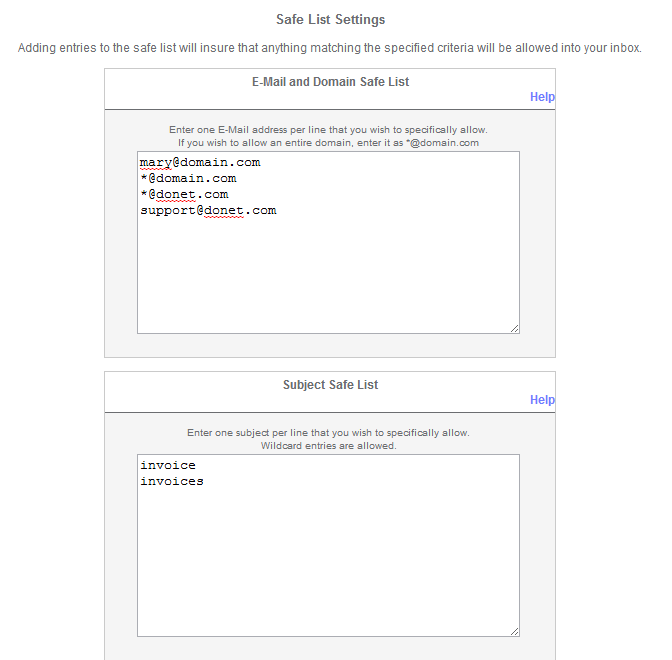
This filter allows you to specify email that you always want to receive no matter what the content is.

  • Email and Domain safe list:
    To add to this list simply enter the email address you wish to be safe or if you want to add an entire domain you can use the wildcard character. For example, if you add ‘[email protected],’ this will allow all emails from Mary to come through. However, if you add ‘*@domain.com’ this will allow any user at @domain.com to send you emails.
  • Subject safe list:
    This allows you to add certain subjects to your safe list. For example, if you receive invoices from many different companies and want to make sure they aren’t tagged as spam you may want to enter something like ‘invoice.’

The * character is used as a wildcard in the safe and block lists, for example *@donet.com indicates that every user @donet.com is included in this list.

mangeSpamFilter10

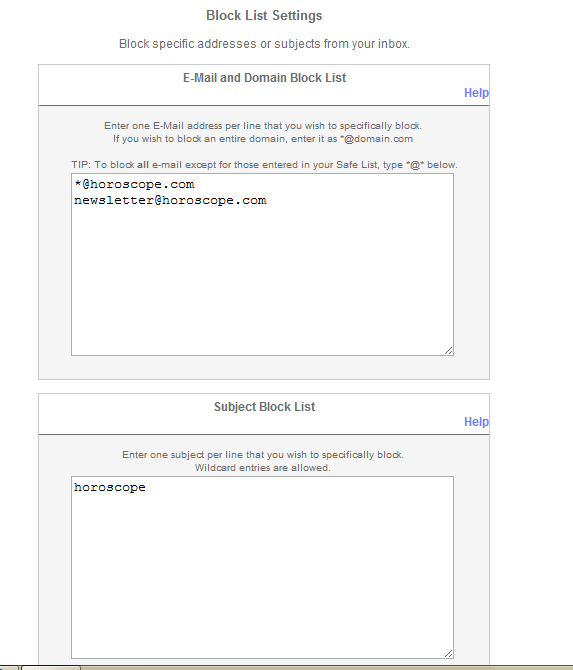
Block list:

This is setup the same as your safe list, except the added addresses or subjects will ALWAYS be sent to your spam folder.

mangeSpamFilter11

Statistics:

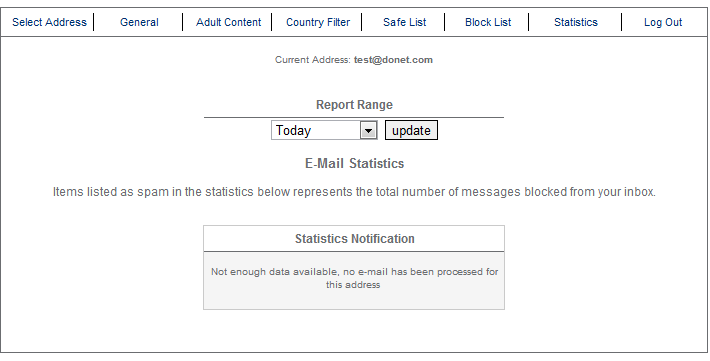
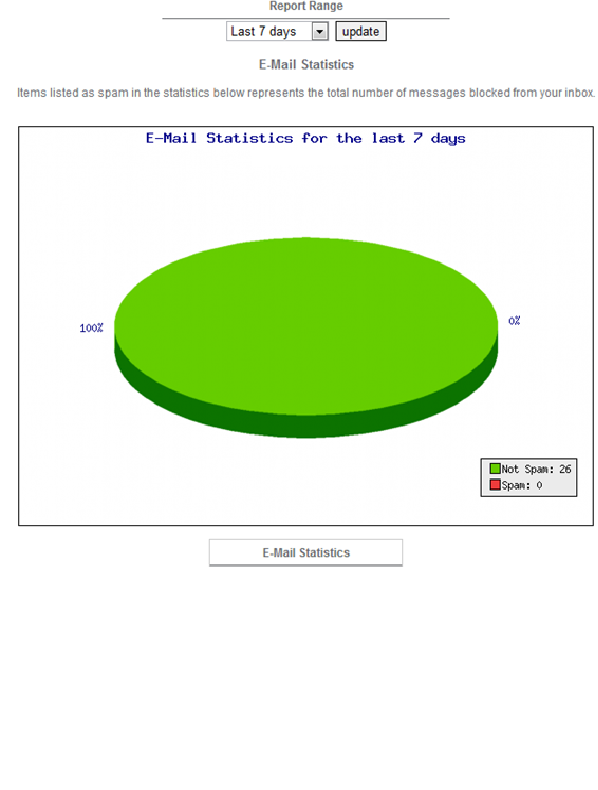
This report gives you the option to get spam statistics for your email inbox.  Just choose the time frame you would like statistics for and hit ‘update’

mangeSpamFilter12

Example Report:

This report shows spam statistics for a user over a 7 day period.

  • 100% of messages that went to the inbox were NOT spam.
  • There were 0 Spam messages and 26 non-spam messages.

mangeSpamFilter13

How do I use Microsoft WebMatrix to publish my Windows Fusion website?

How do I use Microsoft WebMatrix to publish my Windows Fusion website?

How to use publish your Windows Fusion website using Microsoft WebMatrix.

DataYard’s Windows Fusion hosting product is completely compatible with Microsoft WebMatrix. This tool is one-of-a-kind; it allows users to have nearly everything they need to build a website from scratch at their fingertips – and then some.

For general information, tutorials, how-to’s, etc., please visit the Microsoft WebMatrix website. There, you’ll even find step-by-step instructions on how to put together a website from beginning to end

Below you will find instructions on how to publish your Windows Fusion website via FTP and WebDeploy.

FTP:

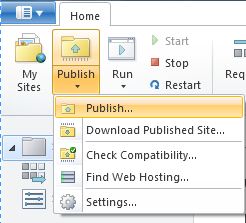
Click the “Publish” icon followed by Publish.

matrix1

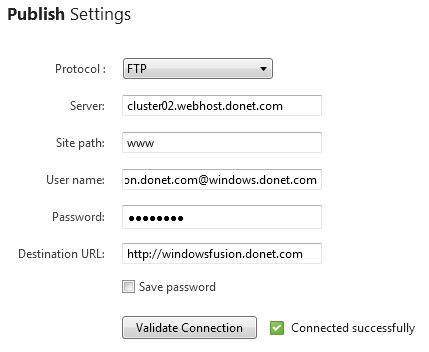
Use the following connection information:

Protocol: FTP

  • Server: webhost.donet.com
  • Site path: www (or whichever directory you would rather publish to)
  • User name: [yoursitename]@windows.donet.com
  • Destination URL: http://[yoursitename.tld]

matrix2

WebDeploy:

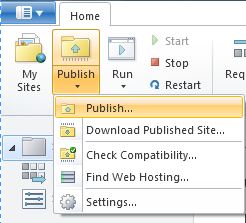
Click the “Publish” icon followed by Publish.

matrix3

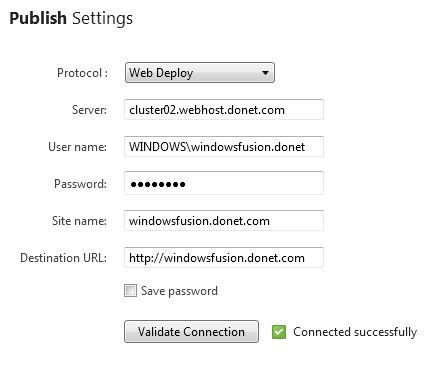
Use the following connection information:

Protocol: FTP

  • Server: webhost.donet.com
  • Site path: www (or whichever directory you would rather publish to)
  • User name: WINDOWS\\ [insert SAM user name here]
  • Destination URL: http://[enter site name here]

matrix4

How do I use WordPress with my Linux Fusion website?

How do I use WordPress with my Linux Fusion website?

Installation guide for WordPress on a Linux Fusion site.

Running WordPress CMS (content management system) on your Fusion website is quite simple. If you’ve ever wanted to use WordPress to manage your web site, but didn’t know how to get started, we’ve put together a quick (~6 minute) video tutorial on how to install WordPress inside your Fusion web site from DataYard.

Please note, this tutorial is specific to Linux Fusion hosting environments.

If you have any questions please feel free to contact support.

What steps should I take if I choose to switch from POP to IMAP?

What steps should I take if I choose to switch from POP to IMAP?

The steps needed to switch your account from POP3 to IMAP.

When switching your account from POP to IMAP, you want to make sure that you don’t lose any important information during the transition. This blog will show you the easiest way to make the change and give you all the little details you need to watch to make sure nothing is lost in the process.

The first thing you want to do is make sure you have a recent backup of the file your email is stored in just in case something goes wrong. If you’re not sure how to make a backup, start here: How do I backup my Outlook 2010 client?

Once your backup is complete, you are ready to begin making the switch!

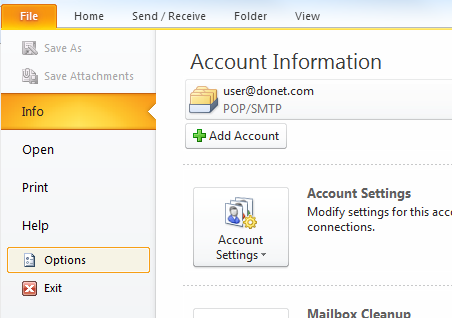
Open your Outlook client and choose the File tab from the top left hand side of the screen.

Next, select Options from the bottom of the list.
popimap1

From the Options Screen you will choose Advanced from the menu on left hand side of the screen, scroll down a bit and you will click the send/receive button.

popimap2

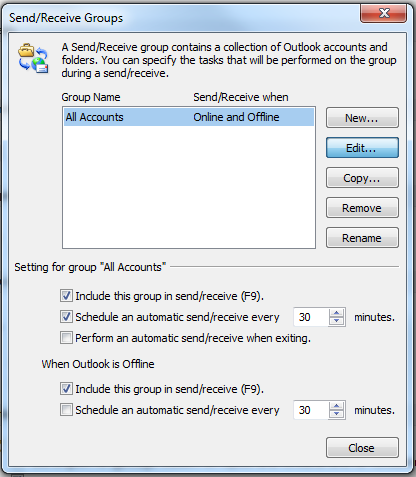
Select All Accounts and then click Edit.
popimap3

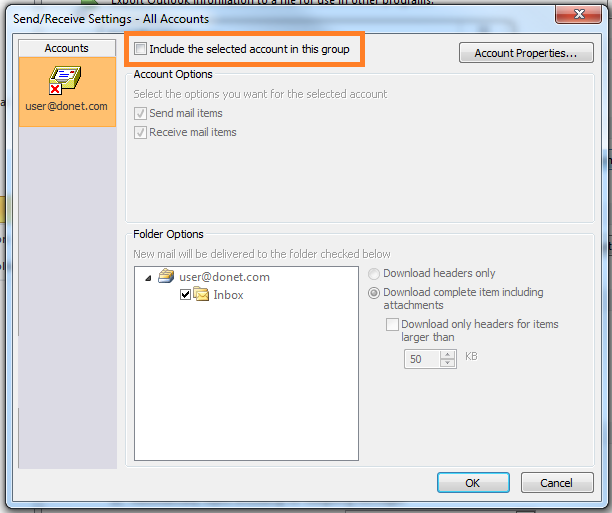
Select your POP account on the left side and uncheck the box next to “Include the selected account in this group.” If you have more than one send/receive group, make sure that your account is disabled under the other groups as well.
popimap4

Now that your POP account is disabled from the send/receive group, you can add in the IMAP account. Select File>Add Account.

popimap5

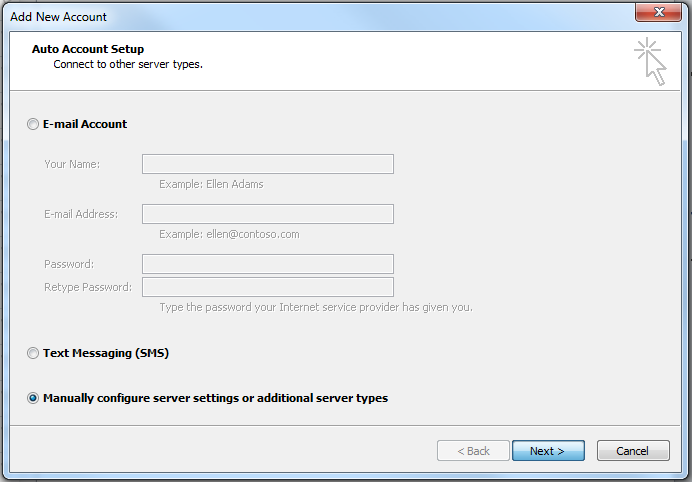
In the new window select Manually Configure Server Settings or additional Server Types.
popimap6

Select Internet Email and hit Next.

popimap7

Complete the following information for the NEW account.

  • Your Name: Name
  • Email Address:  Your full Email address
  • Account Type: IMAP
  • Incoming Mail Server: imap.donet.com
  • Outgoing Mail Server: smtp.donet.com
  • User Name: Your Username
  • Password: Your email password

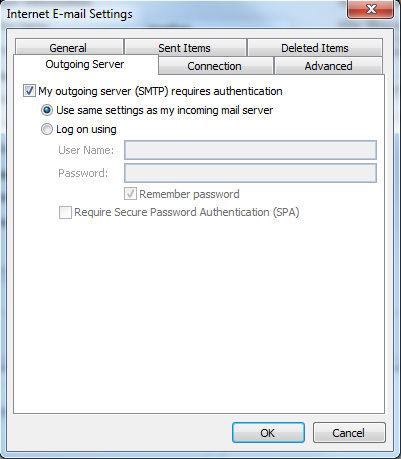
In the new window, select the Outgoing Server tab at the top and check “My outgoing server (SMTP) requires authentication” and use same settings as my incoming mail server.
popimap9

Click on the Advanced tab, and change the outgoing server port number to 587. Then click OK. In the remaining “Add New Account” window, click Next followed by Finish.

Now, on the left Outlook menu (where your accounts and folders are listed), you should see both the POP and IMAP accounts listed. The account with the “(1)” next to it is the new IMAP account.

popimap10

In order to make sure you don’t lose any of your messages and can access them all under the same folder, click on the POP account (the one without the “(1)” next to it) and either select the folders and drag them to the IMAP account or select all of the messages (CTRL + A = select all) and drag them to the IMAP account.

For this example, I selected all of the messages in the inbox of the POP account and dropped them in the inbox of the IMAP account.

Once your mail has all been copied from the POP account to the IMAP account, you can remove the POP account.

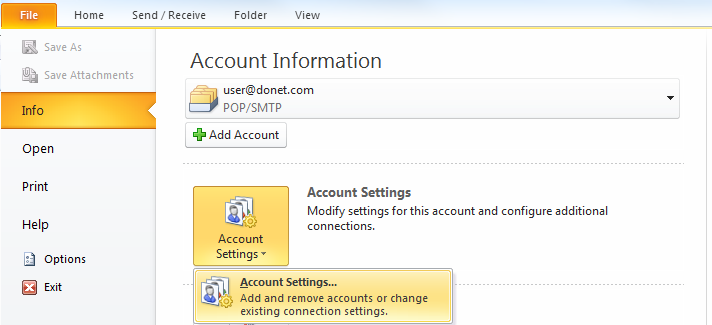
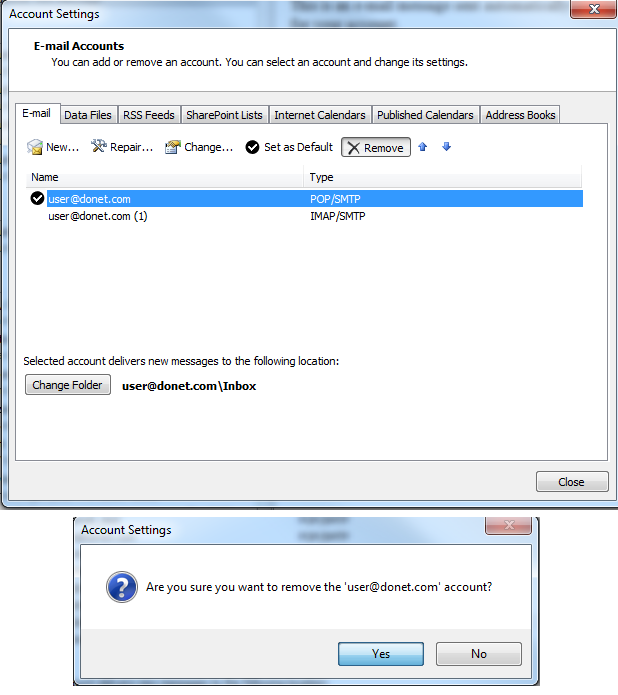
To do this, first click on File followed by Account Settings.
popimap11

Next, select the account under the Email tab that says “POP/SMTP” under “Type,” and click Remove. Click Yes in the pop-up removal confirmation window.

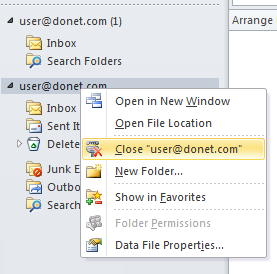
Back at the Home page of Outlook, on the left mail menu, right click on the POP account (the one you removed in the previous step that does not have the (1) next to it) and select Close [email address].
popimap12

popimap13

You have now successfully switched from using POP to IMAP.

How can I reset the password for my E-mail account?

DataYard does not keep passwords stored in plain text for security reasons so we are unable to retrieve current passwords. Passwords can be reset by our support staff as needed.

Please contact technical support contact support.

If you have a password that you would like to use please make sure that you provide it to us and that it abides by the following minimum password requirements:

  • Passwords must be at least 6 characters in length and include a minimum of 1 numeral or special character (examples: %$&^&*)
  • Passwords can NOT contain the username. For example if your username is [email protected] the word ‘test’ cannot be part of your password.

How can I add additional Disk Space to my VDC virtual instance?

How can I add additional Disk Space to my VDC virtual instance?

Assistance with adding additional Disk Space to your VDC.

If you are in need of additional Disk Space in your VDC virtual instance you can contact DataYard Sales at 937-226-6896 or e-mail [email protected] for a price quote.

The initial amount of disk space allotted to a new VDC instance is 25GB. Increases are made in 25GB increments, and there is no maximum allowance.

Please be sure to include how much disk space you would like to increase to and your company information.

What dates are available for Ready Backup restores?

What dates are available for Ready Backup restores?

Find the dates that have available backups from your Ready Backup service.

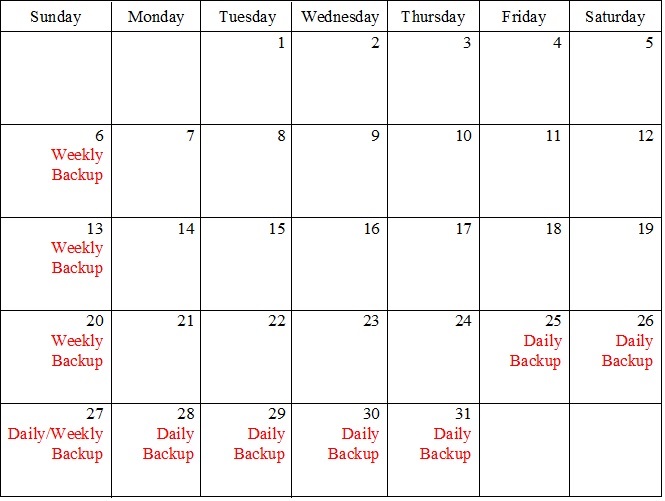
DataYard’s default retention policy for all customer backups includes 7 (seven) daily backups and 4 (four) weekly backups.

This gives you 10 restore points by default, with the oldest being a month.

For example, if you’re calling on the 31st of the month, the following back up dates will be available:

calendar

If you have a customized retention policy contact support for available backups.

How can I direct multiple domain names to my site?

How can I direct multiple domain names to my site?

Who you call to configure multiple domain names to point to one website will vary depending on who your domain is registered through and where it’s hosted. If they are in the same place, it makes this process rather simple.

First, each domain will need to be registered and have DNS hosting setup. Generally, this is done with the same company that provides hosting for your website.

These are the basic steps you will need to take to direct another domain to your website:

  • Register domain name – You can register this domain with any registrar that you choose. However, as I mentioned earlier, it’s easiest to register it with the same company that is doing the hosting for the website. If you wish to register this domain through Tucows, please contact our sales department at 937-226-6896 and they will help you get it registered.
  • Point the new domain name to the proper name servers – Name servers are what connect your domain name to your DNS hosting for that domain. You should have already setup DNS service with your hosting provider and know where to point these.
  • DataYard Name Servers are:
    • dns1.donet.com
    • dns2.donet.com

If you are logged into the Tucows web portal and are managing your name servers, you will go to Name Servers

And then enter the name servers, one per line.

Once complete, hit Save Configuration.

Point the domain name to the same IP as your main website – DNS should already be setup with your hosting provider. They will just need to know the IP address of your main website (the primary Address record also points to this). If they are also providing the hosting for the main website they probably already know this information.

Call the hosting provider to set up the alias on the server-side- The last step is to call the hosting provider (if not the same as above) and have them setup a server alias for the new domain.